| Оглавление |
|---|
...
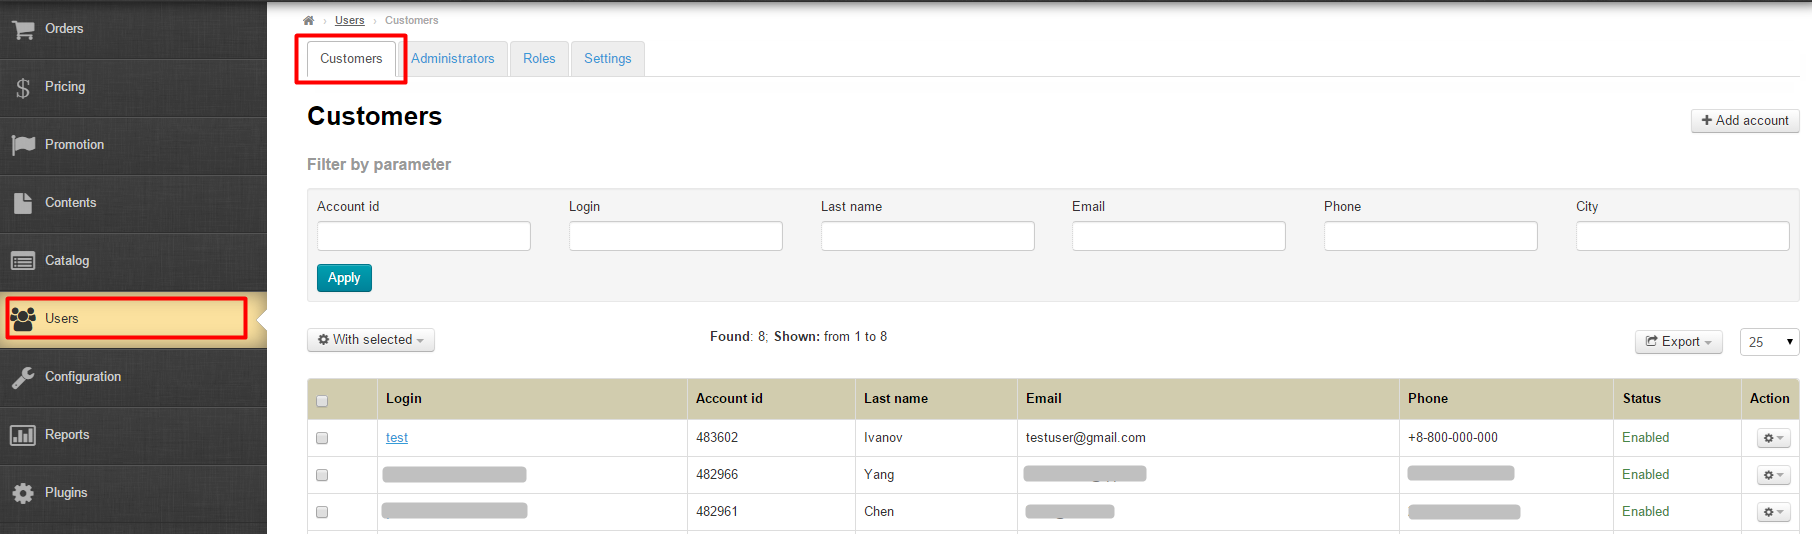
This is where you may view or edit your site’s customers.
Navigate to: Users > Customers in the administrative area.
Description
This subsection contains customer information. Here one is able to edit the customer’s profile or create a new user account.
...
For convenience’s sake, one can filter customers by using different criteria and specify the number of customers displayed per page. By default, the first 10 customers are displayed in the paginated list of results shown at the bottom of the page.

The page consists of two main parts: customer filters and the list of customers.
...
Login (using which a customer log in on your website)
User ID (a unique numerical identification number)
Last name
E-mail
Phone number
Status (There are two types of statuses: enabled and disabled. Can be modified using “Actions”)
Actions (You can perform a number of actions on each customer individually)

Filters
The following predefined filters are available to search for customers:
...
To search for customers by filters you need to select one or several of the above criteria (in our example we will use “Login”).

Type into the appropriate text field (several or all characters).

Once you have typed into the text field click the “Apply” button.

After doing so, all customers that match specified filter criteria will be displayed in a table beneath the Filter section.

As a result, the filtered output can contain, for example, all the Ivanovs from Moscow or those who have mailgmail.ru com account.
Actions
The following actions can be performed on each user: add, export (all users), ban or remove.
Add account
If it is necessary to add a user you should click the “Add user” account” button.

This will bring up a form for the addition of a user.

Fill out the “Login” text field (one should use the Roman capital and/or lower-case letters from a to z and numbers from 0 to 9 and/or special characters (underscore and minus sign)).

Enter a password (one should use the Roman capital and/or lower-case letters from a to z and numbers from 0 to 9 and/or special characters (underscore and minus sign)).We We recommend that users who have administrator rights create strong passwords. Your password should consist of at least 6 characters and contain both capital and lower-case lettering and numbers.

Fill out the e-mail address text field (This is the e-mail address to which notifications are sent. It is also needed to reset or change a password).

Enter a user's first name.

Enter a user’s last name.

Type a user's gender.

The above text fields are mandatory. To add the user you should click the “Save” button at the bottom of the form.

The rest of the fields are optional and should be filled out if required.

The user will appear in the list after saving.

Export
The entire user list can be exported in the following formats: (*.xml, *.xls or *.txt). The export file will contain the following data:
...
To export users click on the Export button.

In the list that appears select a desired format (*.xml, *.xls or *.txt).

Once the format has been selected a file that contains the list of users in the selected format will be stored on your computer.
Lock a user account
If it is necessary to restrict a user access to a website (e.g. user comments contain erroneous negative information) the user's account can be banned (locked).
To do this, click on the gear icon opposite the user’s name in the “Actions” column.

Сlick on the “Lock user account” item on the dropdown menu that appears.

After clicking on the “Lock user account” item the user’s status changes to “Locked”.

When attempting to login the user will see a message “Your account is locked”.

Unlock a user account
...
To enable (unlock) a user account you need to click on the gear icon opposite the user’s account in the “Actions” column.

Click on the “Unlock user account” item on the dropdown menu that appears.

After doing so, the status will change to “Enabled” and the user will be able to login on the website.

Remove a user account
| Информация | ||
|---|---|---|
| ||
User accounts will be permanently removed. It’s impossible to remove user who have not completed their orders |
To remove a user account from the administrative area you need to click on the gear icon opposite the user’s name in the “Actions” column.

This will bring up a dropdown menu where you should click on the “Remove user account” item.

Once you have clicked on the “Remove user account” item you should confirm your choice.
If you are sure you want to remove the user account click “Yes”.

Login as a user
...