...
Navigate to: Users > Customers in the administrative area.
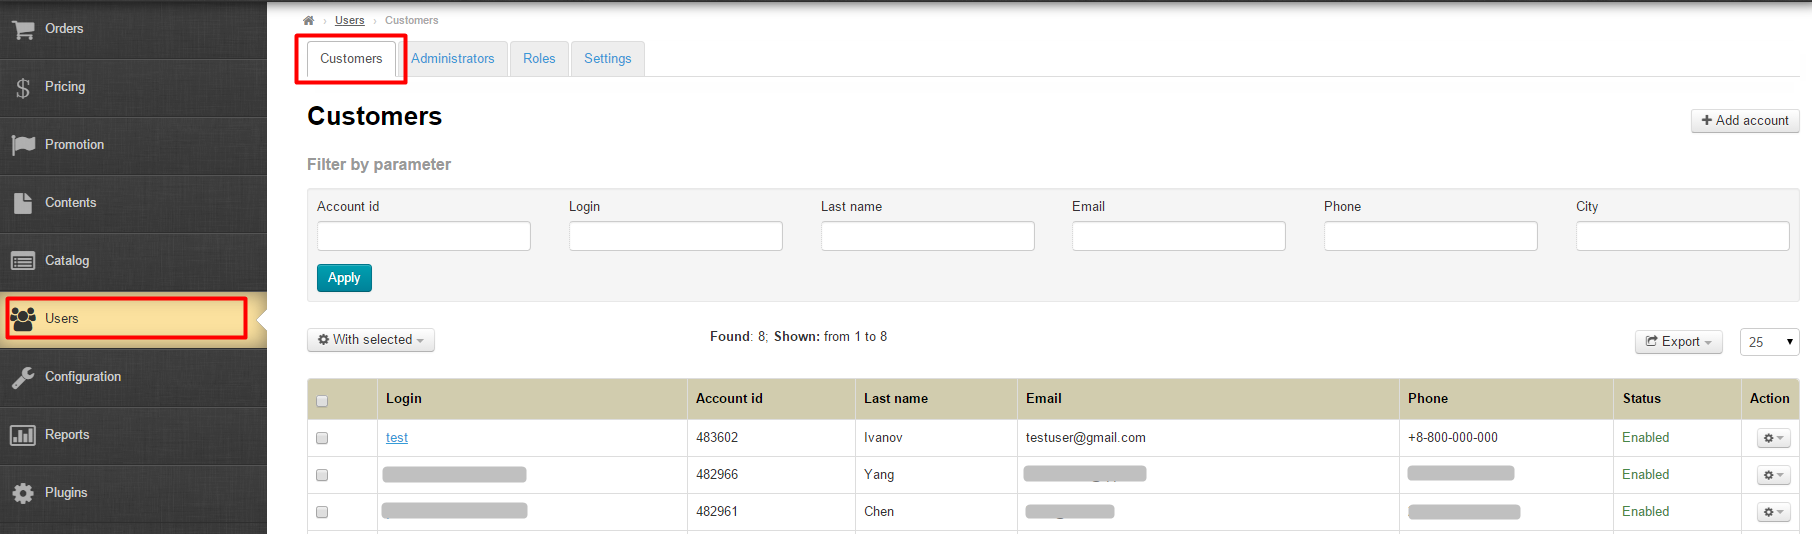

Description
This subsection contains customer information. Here one is able to edit the customer’s profile or create a new user account.
...
Login (using which a customer log in on your website)
User ID (a unique numerical identification number)
Last name
E-mail
Phone number
Status (There are two types of statuses: enabled and disabled. Can be modified using “Actions”)
Actions (You can perform a number of actions on each customer individually)
Member since


Filters
The following predefined filters are available to search for customers:
User ID
Login
Last name
E-mail
Phone number
City/town
- Registration date
To search for customers by filters you need to select one or several of the above criteria (in our example we will use “Login”).
...
The entire user list can be exported in the following formats: (*.xml, *.xls, *.xlsx or *.txt). The export file will contain the following data:
Account id (OtapiID)
Login
E-mail
- LastName
- FirstName
- MiddleName
Full name
Phone number
To export users click on the Export button.
...
In the list that appears select a desired format (*.xml, *.xls, *.xlsx or *.txt).


Once the format has been selected a file that contains the list of users in the selected format will be stored on your computer.
...
To login as a user click on the gear icon opposite the user’s name in the “Actions” column.

Click on the “Login “Sing in as user” item on the dropdown menu that appears.

Once you’ve done this, your website will open in a new browser’s tab where you are authorized as a particular user.

Actions with multiple users
...
To do so, in the first column on the left you should select the checkboxes opposite appropriate users (select from the list).

If you need to select all users on a page check the checkbox on the table header.

When all users have been selected click the “Selected” “With Selected” button which is above the table.

Click the needed item on the dropdown menu that appears.

After clicking the item the action will be performed automatically.
You have to confirm if you wish to delete user accounts.
Customer information
To find customer information you need to click on a customer login.

General information
Clicking a user login will open a page that contains general customer information.

Login
It may be necessary to login to a user account on a website. Since a password is initially hidden and cannot be shown (which is a system security requirement) one is able to login as another user from the administrative area.
To login as a user you will need to click on the “Login” button.

Once you’ve done this, your website will open in a new browser’s tab where you are authorized as a particular user.
Reset a user’s password
To reset a password in the administrative area you should click on the dashed blue underlined text “Reset password”.

This will display a password reset form.

In the form that opens enter a new password (you should use the Roman capital and/or lower-case letters from a to z and numbers from 0 to 9 and/or special characters such as underscore and minus sign) or auto-generate a password.
To auto-generate a password click on the gear icon on the right of the password field.

After clicking on the icon a password will appear in the field.

Save the password by clicking the “Save” button.

After you click “Save” you will see the following notification: “Password was changed successfully”.

Edit
Click the Edit button to edit customer information.

This will display customer information Edit Form.
For more information on how to fill out the fields, see the ‘Add” “Add” section (the editing and addition forms are similar).

After that, you will need to click the “Save” button to apply changes.

Account
Here one can deposit a sum into a user's account or withdraw a sum from a user's account.

...
| Информация | ||
|---|---|---|
| ||
All operations are conducted in the base currency. |
...
Deposit a sum into a user's account
To deposit a sum into a user's account click the "Deposit" button.

This will display a form where you should enter a sum to deposit and a note.

Click the "Deposit" button.

After that, the sum will be deposited into the user account and this information will be shown in the administrative area.

A customer will also see that the sum has been deposited.

Withdraw a sum from a user's account
To withdraw a sum from a user's account you need to click the "Withdraw" button.

This will display a form where you should enter a sum to withdraw and a note.

Click the "Withdraw" button.

After that, the sum will be withdrawn from the user account and this information will be shown in the administrative area.

Operations
The Operations table contains a list of all account operations. For example, if a customer has paid for an order using his/her personal account, this information will also appear on the website.

Orders
This tab shows all customer orders.

View
Orders are available in the view mode. In essence, it is a summary table that contains the following data:
Order number
Creation date
Sum
Paid
Operator
Order status
If you click on an order number the Order page will open in a new tab.
