...
"Showcase currencies" block is responsible for displaying currency on this page. Go to "Pricing" section:
Open "Currency" tab to make changes:
...
Add currency clicking plus button:
Сейчас эта валюта в конце списка, а нам надо, например, поставить её первой:
Для того, чтобы изменить положение валют, наводим мышку на левый край поля с валютой, как показано ниже (курсор станет крестиком со стрелочками):
Нажимаем левой мышкой на крестик так, чтобы появилась рука, а блок с валютой посерел:
Теперь тащим «руку» вверх, чтобы валюты поменялись местами:
Готово. Теперь валюты в нужном нам порядке.
Сохраняем изменения, нажав кнопку «Сохранить» внизу страницы:
После сохранения все изменения вступят в силу и валюта в карточке товара добавится.
Pricing section consists of the following basic subsections:
- Currency Setup
- Currency Displaying Set-Up
- Synchronization Mode
- Currency Rates
- Prices Rounding
- Goods Prohibited (Blocked) for Selling
- Markup Percentage
- Minimum Markup
- Discount Management
- Delivery within China
Currency Setup
The first value of this section is internal currency. It is the currency of calculations, prices displaying in the customer’s Shopping Cart and invoicing. Internal currency is set at the time of key registration and does not subject to future unassisted alterations.
If you need to change the internal currency, send a request to OT Technical Support. Please note that if you change the internal currency, it will be impossible to recalculate the old orders (existing orders, i.e. generated at the present moment) to the new currency.
Currency Display Set-up
The list of currencies displayed in the storefront can be selected in this subsection.
Currency list consists of two columns: the chosen currencies and available currencies. The chosen currencies colored gray and the available currencies are yellow.
The currency transferring (from column to column and swapping) shall be made as specified below:
- Move the cursor to the currency box (e.g. USD in the right column);
- Capture the box with mouse click and hold it;
- Drag the box to the chosen column and place (while holding the mouse button);
- As soon as the chosen point is reached, release the mouse button;
- In the end of the operations press Save Currency Set-Up to apply changes.
To set the currency list, drag the chosen currencies from the right column of the available currencies (colored yellow) to the left list. The same is for deleting unnecessary currencies from the left list – drag it to the right.
To set the sequence of currencies, reverse them in the desired order. The currency exchange rate to Chinese Yuan (RMB) should be set for the chosen currencies in the Currency Rates subsection.
If the required currency is not available in the right column, ask the Technical Support to add it.
So the currency list is set. The upper currency from the list is displayed as the currency of the price in the storefront, search results and the product listings; in the product card the price is displayed in all chosen currencies and in the specified order.
Synchronization Mode
Currency rates used to display the prices on your site can be set in two ways: manually or automatically (by means of synchronization with Central Bank of Russian Federation (CB)).
The example given below shows the manual mode without synchronization with CB.
Currency Rates
The rate for all chosen currencies in the left column shall be set.
As specified in the example above 1 Russian Ruble is equal to 30 USD, 1 RMB= 5.65 RUB.
To add a new rate press Add button.
The first currency is to be taken as “1” and the second one takes the meaning of “proportion” and shall be set up manually.
E.g. the first currency is EUR, the second is RUB. We want 1 EURO to be equal to 50 Russian rubles. Set up values as it shown in the example below and press YES. The result will be as follows:
The setup proportion will be used every time when converting EURO to Russian Rubles. It means the currency rate data is considered when converting product price displayed in the storefront to another currency.
Rounding
This option provides the prices rounding (price is difficult to apprehend if it looks like 45,6006064556 after recalculating). Rounding is a number specifying the number of digits to be left after dot.
Example.
Given: 123.123
If “2” is entered, the result is 123.13.
If “0” is entered, the result is 124.
If “-2” is entered, the result is 200.
The value for this option is to be set in a separate box and saved.
Important! The program always rounds up.
Products Prohibited For Selling (Blocked Products)
In this section we specify the option to purchase products upon the specific conditions:
- Products for auctions are allowed for purchasing;
- Products without domestic shipping are allowed for purchasing;
- Second-hand goods are allowed for purchasing.
If you are about to allow the products with special features for purchasing – tick the relevant item and save the chosen values.
This option helps to avoid difficulties of any kind when purchasing the specified categories of the products. E.g. if the second-hand goods are allowed for purchasing you should be ready for out-of-order or low quality product.
Markup Persentage (%)
The markup provides the certain revenue amount (%) and/or covers expenses (logistics, money transaction commission, etc.).
To set up a markup, enter the desired value (in percent) and save it. After saving operation the chosen markup will be added to the price of every item.
Save changes by clicking the Save button on the bottom of the page.
Minimal Markup
Set up the minimal threshold for markup calculation in RMB. It is used when markup does not change significantly the product price because the price is too low.
E.g. we want our markup to be not less than 10 RMB.
Save changes by clicking the Save button on the bottom of the page.
Discount Management
If you support the discount system, tick the relevant field. Manage your discounts in the Discounts Management section (2nd menu row in admin area, 1st left item).
Save changes by clicking the Save button on the bottom of the page.
Shipping Within China
In this section we choose the delivery service for package shipping within China (from Taobao to logistician).
The choice can be made by dragging boxes (the same way as in the CURRENCY DISPLAY SET-UP section). Drag one or more services to the Applicable Shipping Methods section; move the methods of no use to the Non-Applicable Shipping Methods section.
Choose the point of destination below: click the link and choose the region of your logistician location in the pop-up window.
This currency is at the end of the list now. For example, we need to put it on first place:
Move the mouse over the left edge of the currency field as shown below (cursor will become a cross with arrows) to change currencies order:
Click left mouse button. A hand will appear and a block with the currency turns gray:
Drag the «hand» up now to change currencies order:
Ready. Currencies are in necessary order now.
Save changes clicking "Save" button at the bottom of the page:
Changes will take effect immediately after saving and currency will be added to product card.
I want to forbid Taobao discounts. How to do it?
Go to "Pricing" section:
Click "Price" tab:
Find "Seller's discount" field:
Click blue dotted text "Allow":
Select "Forbid" option in drop-down menu:
Save choice clicking check-marked button:
Ready. Seller's discounts are not shown on your site any more.
Is there a solution for discounts for my VIPs?
Go to "Pricing" section:
Click "Discounts" tab:
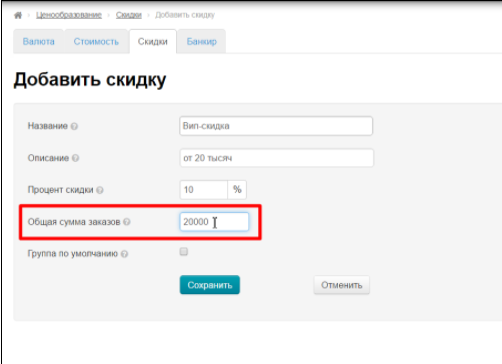
Click "Add discount" tab:
Settings page will open where we write name and description:
Set percent of discount:
Write total amount of orders - amount for getting VIP-discount. For example, 300 USD (as base currency is USD):
Сheck "Default Group" box if discount will be applied to any customer reaching this total amount of orders:
Don't check "Default Group" box and save the page if you want to select discount holders personally:
Find created discount and click the button with the person's icon in "Actions" column:
Start writing customer’s login now and admin panel will give you those users with these letters at the beginning of the login:
Select necessary customer and save choice clicking check-marked button:
Ready. You can add as many customers as you want.
I have a "Banker" module. How to set pricing using this module?
First, define pricing policy you want. For example:
- Goods Товары до 100 юаней с наценкой 5 юаней
- Товары от 100 юаней с наценкой 20%
- Доставка по Китаю за 1 единицу товара будет 5 юаней
- Сам факт доставки по Китаю (независимо от количества) 25 юаней — чтобы эта сумма прибавлялась ко всему заказу у продавца.
Заходим в раздел «Ценообразование»:
Открываем вкладку «Банкир»:
Нажимаем кнопку «Добавить ценовую группу»:
Заполняем название и описание группы:
Выбираем товарного провайдера, для которого настраиваем ценообразование:
Если создаваемое ценообразование будет справедливо для всех-всех товаров, ставим галочку «Группа по умолчанию».
Если мы хотим продавать по таким условиям, например, только сумки, то галочку не ставим. Группу товаров зададим потом.
Задаем доставку, как решили в начале. В поле «Значение доставки» пишем сколько будет юаней за 1 штуку товара:
В поле «Фикс. наценка на доставку» пишем сколько в общем хотим прибавлять к доставке:
Теперь пишем интервалы цен:
После указания интервалов пишем условия. Первый интервал — у нас выбрана фиксированная наценка, а во второй — процентная:
Готово. Сохраняем.
Хочу индивидуальные наценки на категорию «Сумки». Как с помощью модуля «Банкир» это сделать?
Заходим в раздел «Ценообразование»:
Открываем вкладку «Банкир»:
Создаем ценовую группу со своими наценками, как было писано в вопросе выше и сохраняем, чтобы ценовая группа появилась в общем списке:
Если мы хотим использовать это ценообразование для конкретной категории товаров, например, для сумок, то ищем созданную ценовую группу в списке.
В колонке действия кликаем по кнопке с шестеренкой:
И выбираем «Редактировать категории ценовой группы»:
Откроется страница для добавления категории. Нажимаем надпись «Добавить»:
Ищем категорию «Сумки» у себя на сайте и копируем ссылку на эту станицу:
Вставляем ссылку в специальное поле:
Нажимаем «Добавить»:
Готово. Теперь созданная ценовая группа работает только для указанной категории и всех её подкатегорий (если они есть)Save changes by clicking the Save button on the bottom of the page.