...
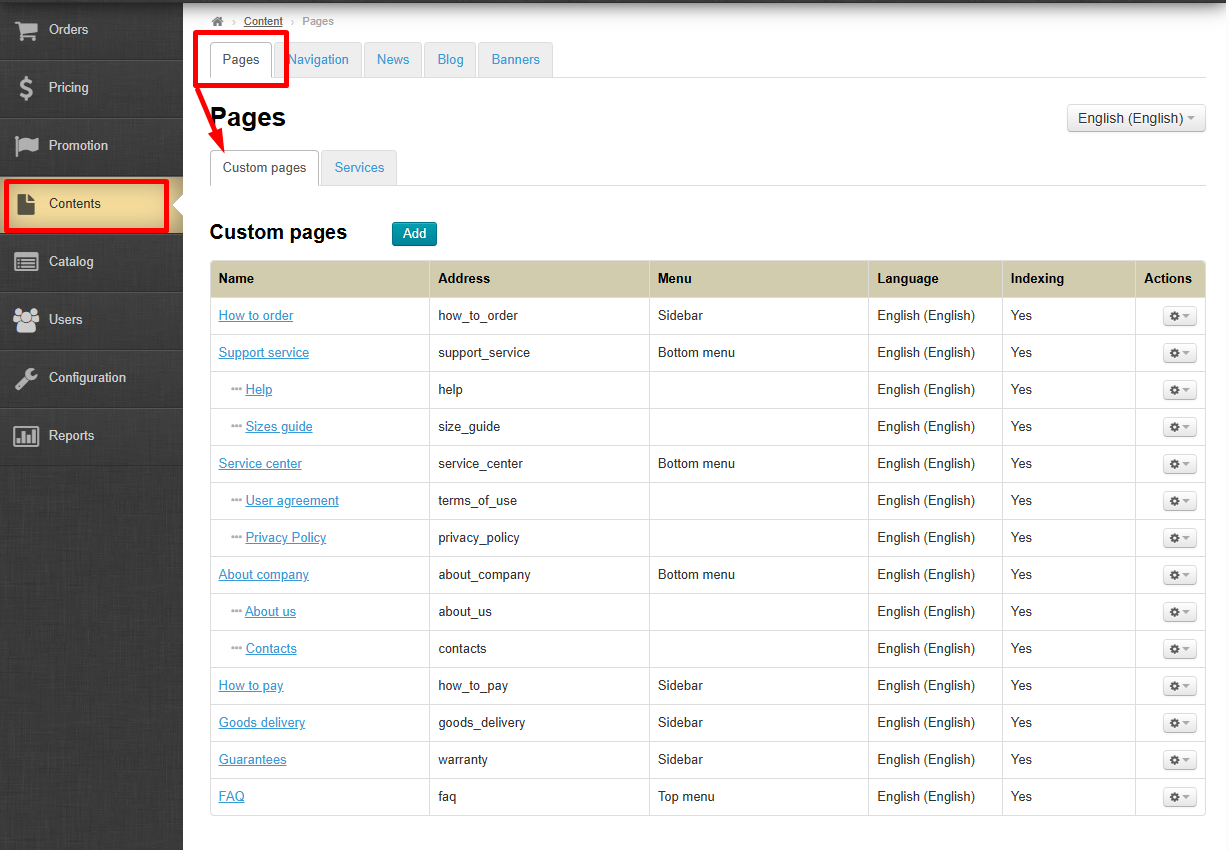
Text pages for the website are added here: contacts, policies, terms and conditions, and more.
Расположение в админке: Содержание → Страницы → вкладка ПользовательскиеLocation in admin panel: Contents → Pages → Custom pages.
...
Language Version ("Multilanguage" module)
| Информация |
|---|
Модуль «Мультиязычность» входит в комплект Коробок ОТ версий «Топ» и «Стандарт». Если у вас Коробка ОТ версии «База», обратитесь к вашему менеджеру для покупки модуля. |
Добавить и настроить текстовые страницы можно отдельно для каждой языковой версии вашего сайта.
"Multilanguage" Module is included in “Top” and “Standard” OT Box versions. If you are using “Basic” version of OT Box, please contact your manager to purchase this module. |
You can add and configure text pages separately for each language version of your website.
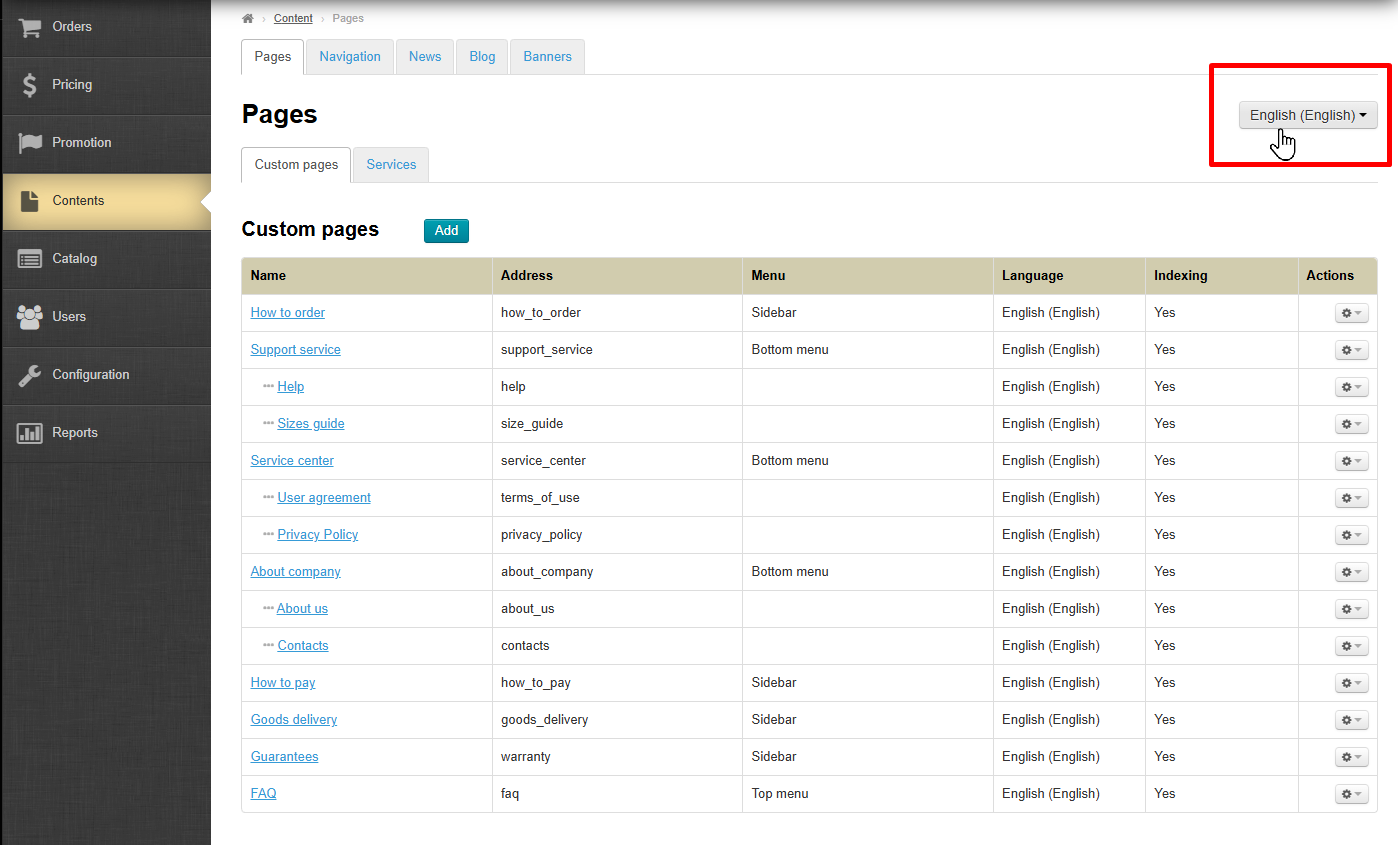
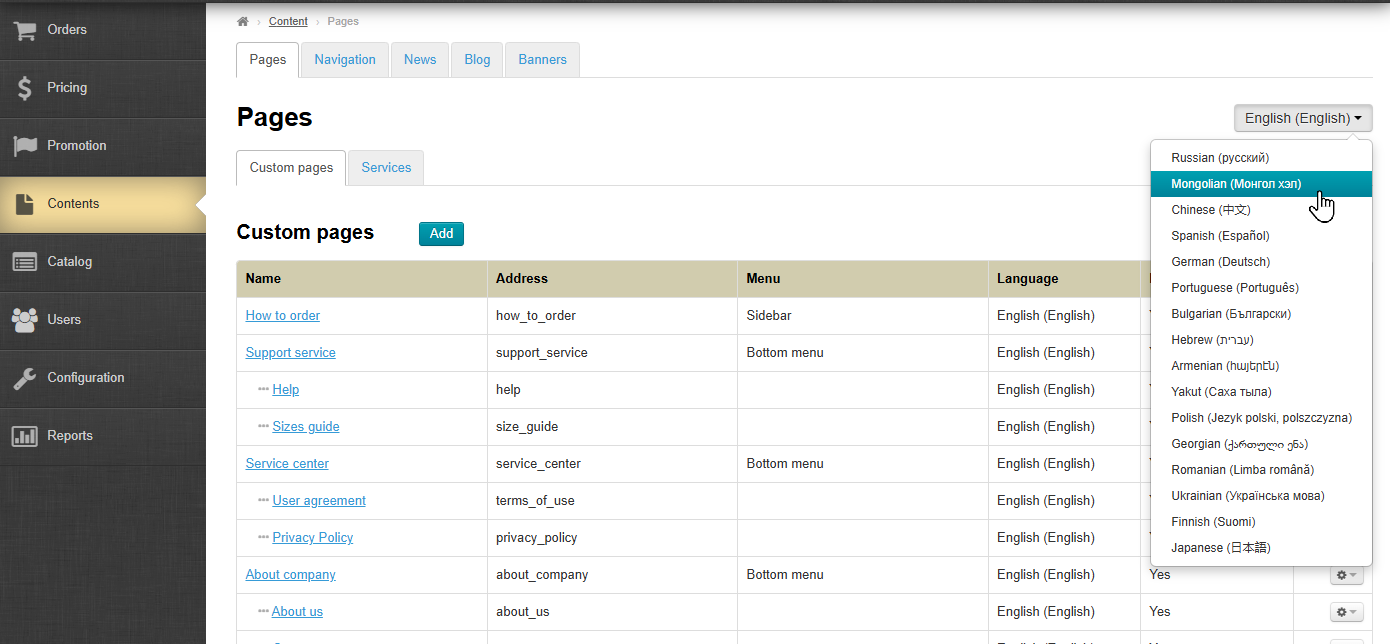
In the top-right corner of each section page, there is a language selector. Click to choose necessary languageСправа вверху страницы каждого раздела есть выбор языка. Выбираем нужный кликом мышки.
Как выглядит на сайте
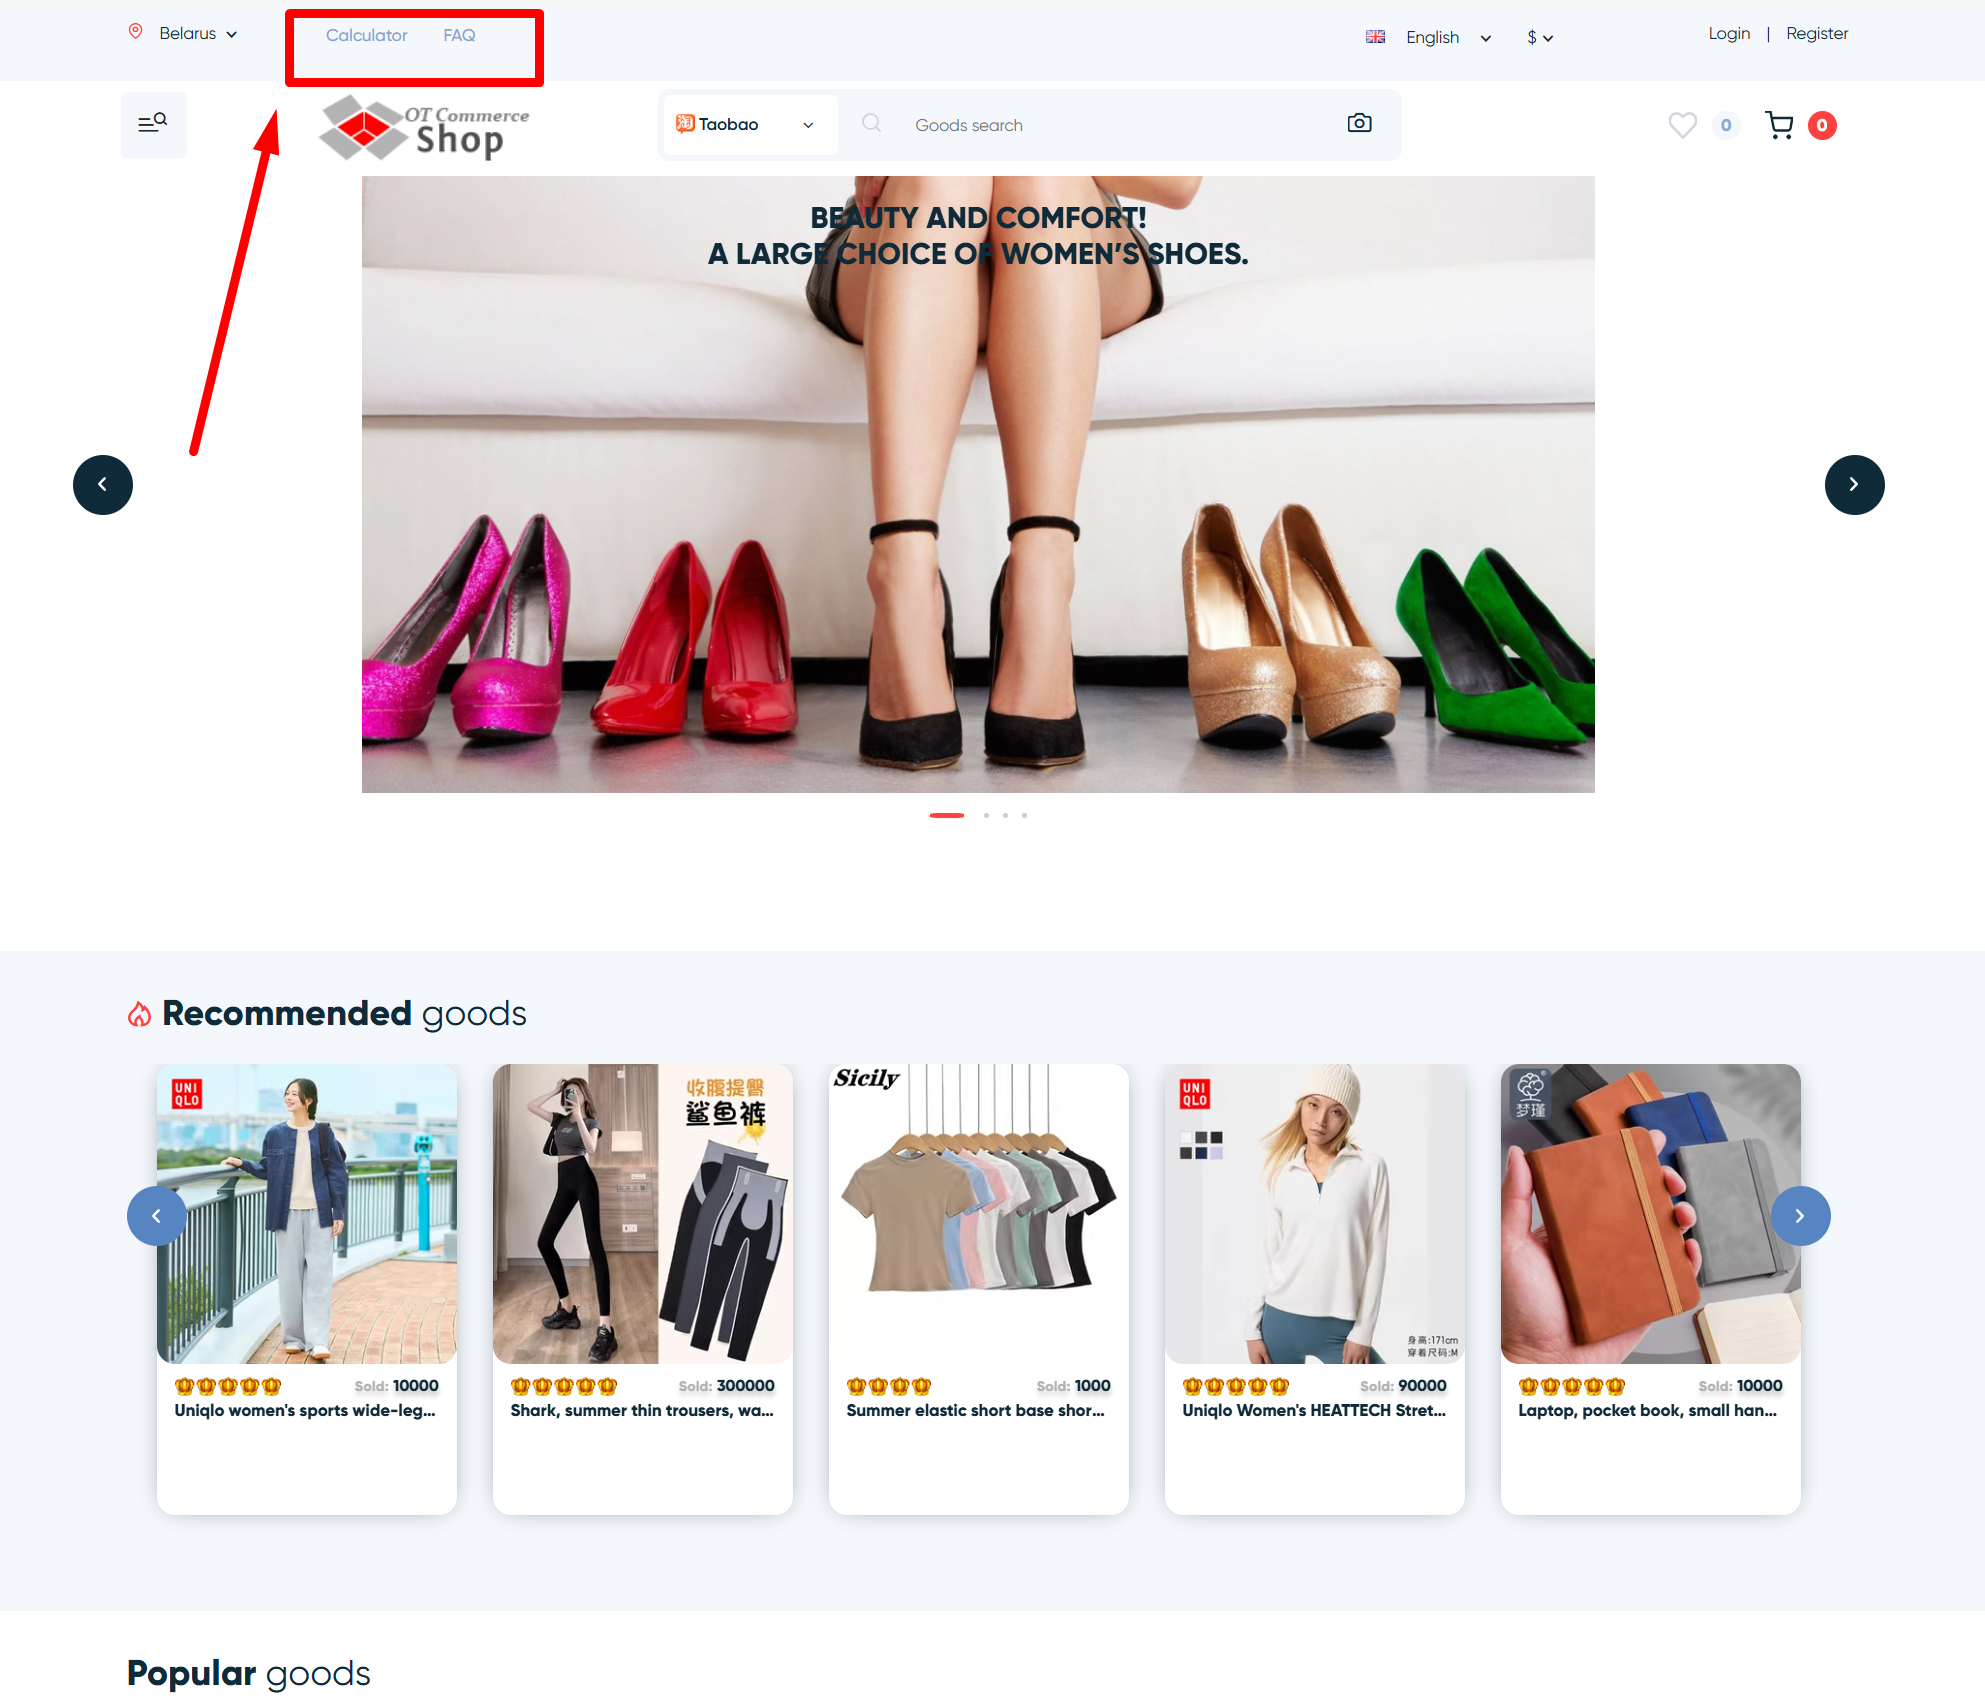
Шапка сайта: все что нужно для заказа
Рекомендуем ставить сюда самые популярные и нужные в моменте выбора товаров страницы.
Калькулятор доставки, таблицу размеров, условия доставки и прочее. Этими страницами ваши покупатели пользуются постоянно и они влияют на то, закажет покупатель товар или нет.
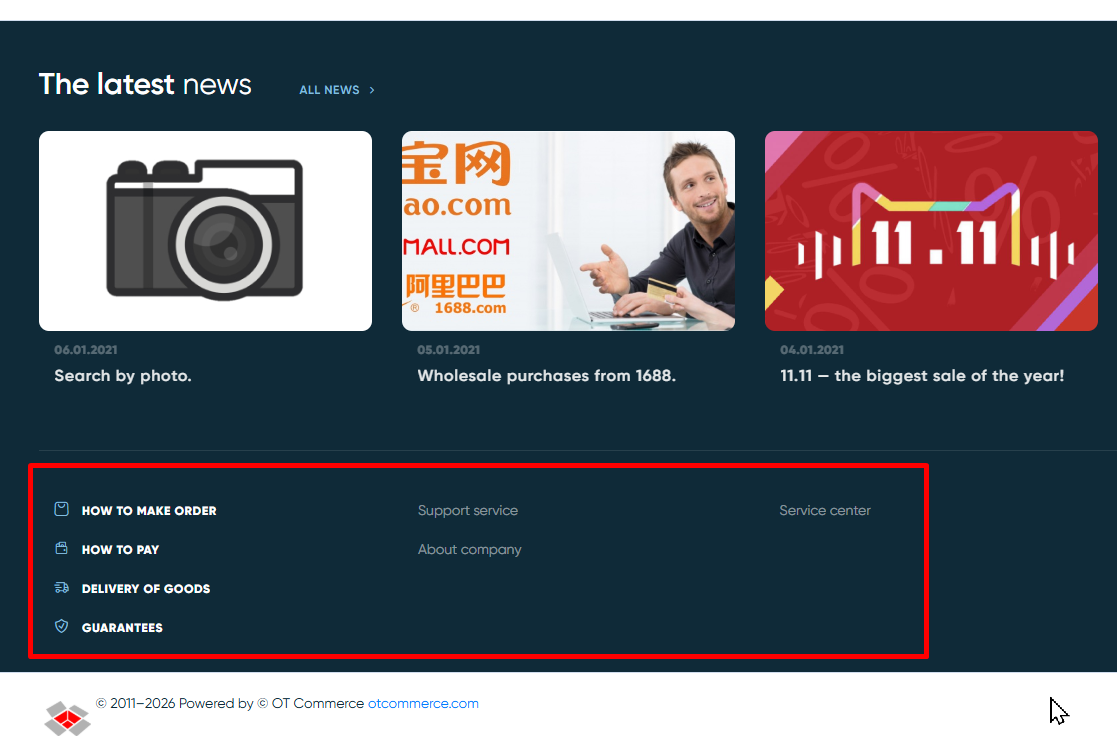
Подвал сайта: вся информация по условиям работы
Политики сайта, гарантии, контакты, статьи по оформлению заказов и прочее.
Эти страницы не критичны для выбора товаров (как например таблица размеров), но когда покупатель заинтересовался ассортиментом, он пойдет искать дополнительную информацию именно в подвал сайта. Поэтому всю информацию, которую вы хотите донести до покупателя, надо оставлять тут.
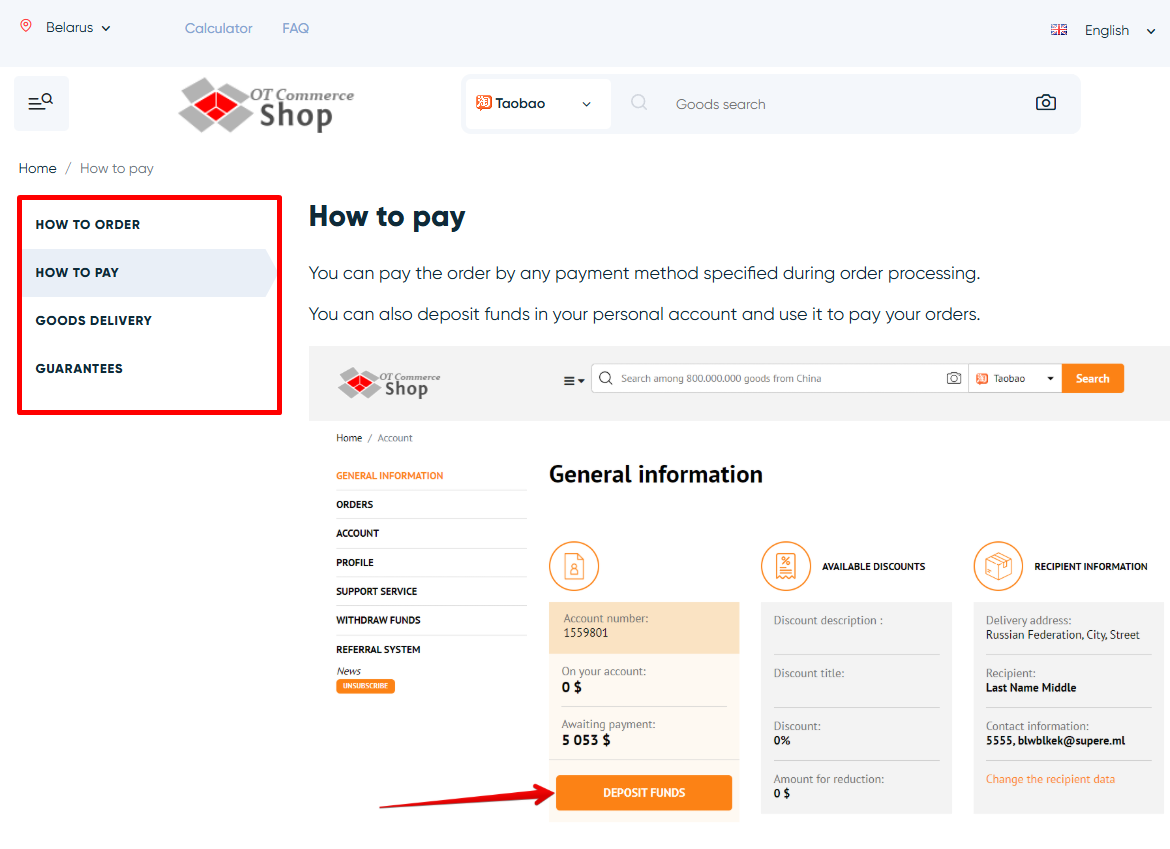
Боковая колонка: подразделы текстовых страниц
Боковая колонка видна только, когда покупатель смотрит текстовые страницы
Добавить страницы
Разделы и подразделы
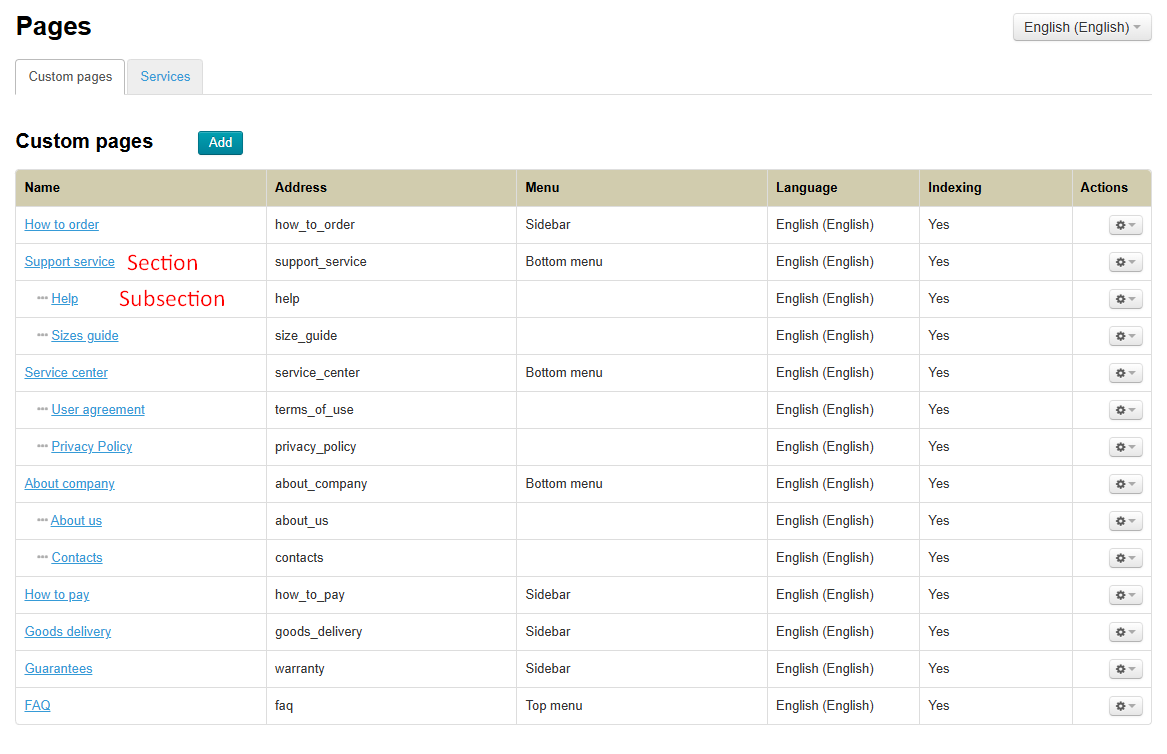
Страницы, которые можно добавить, делятся на разделы и подразделы. То есть можно добавить просто страницу, а можно добавить страницу и сделать в ней подразделы — добавить внутрь еще несколько страниц.
Максимальная вложенность 2. Это значит что у страницы могут быть подразделы, но нельзя добавить подразделу еще один подраздел.
Добавить
Чтобы добавить страницу, нажимаем на кнопку «Добавить».
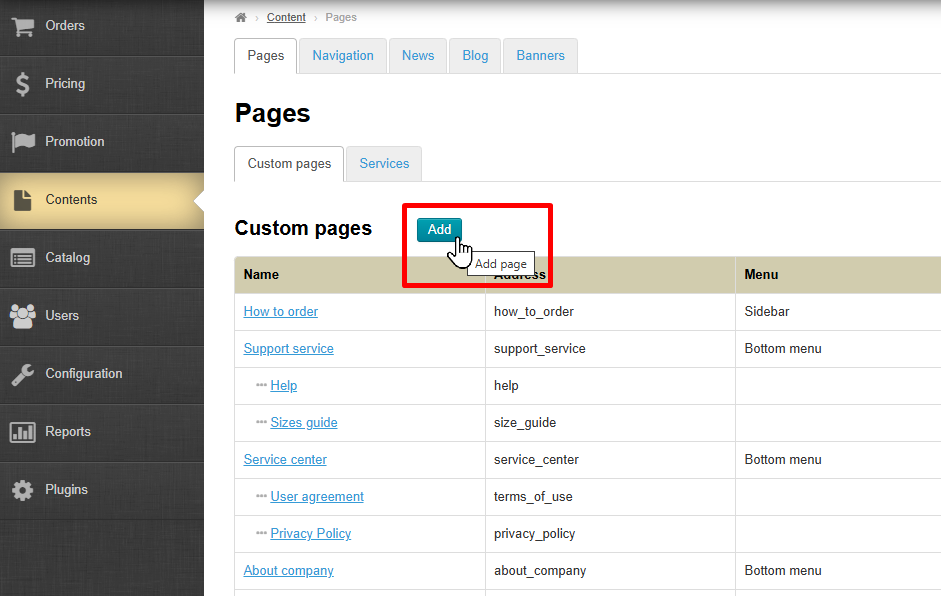
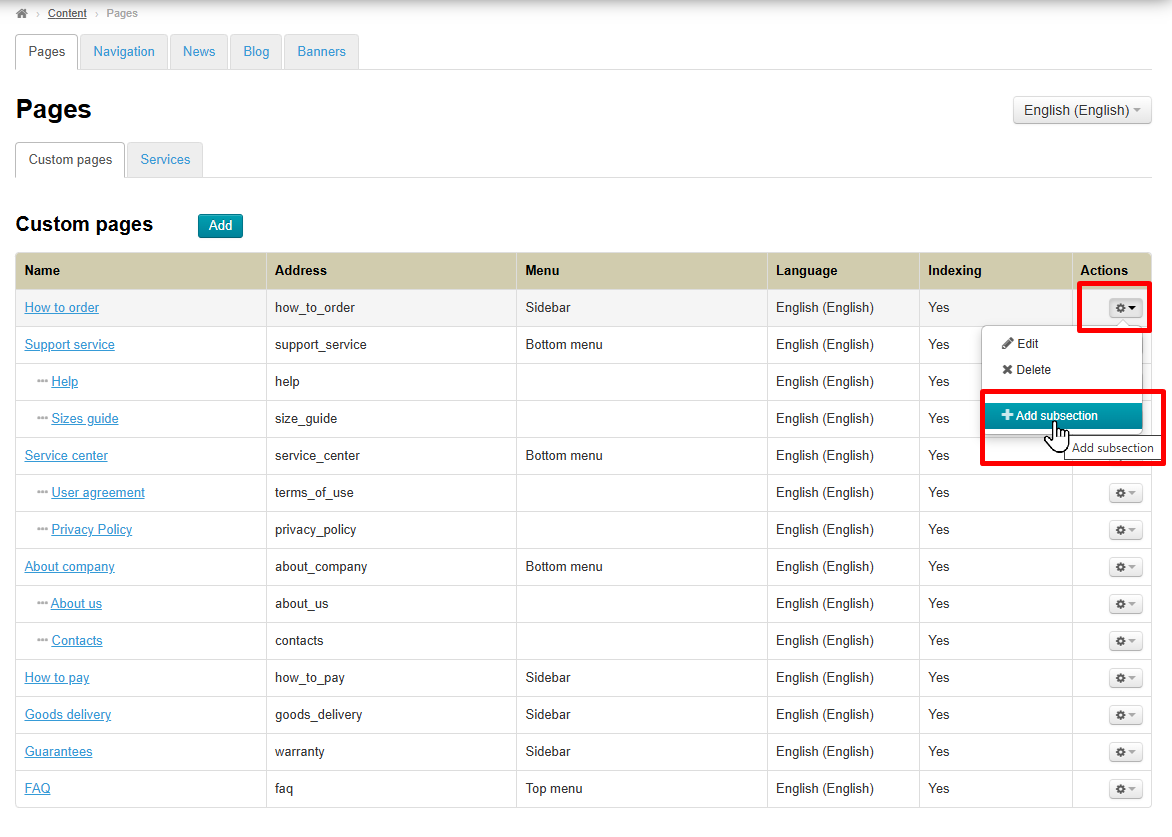
Чтобы добавить подраздел, кликаем на шестеренку в колонке «Действия» и выбираем «Добавить подраздел».
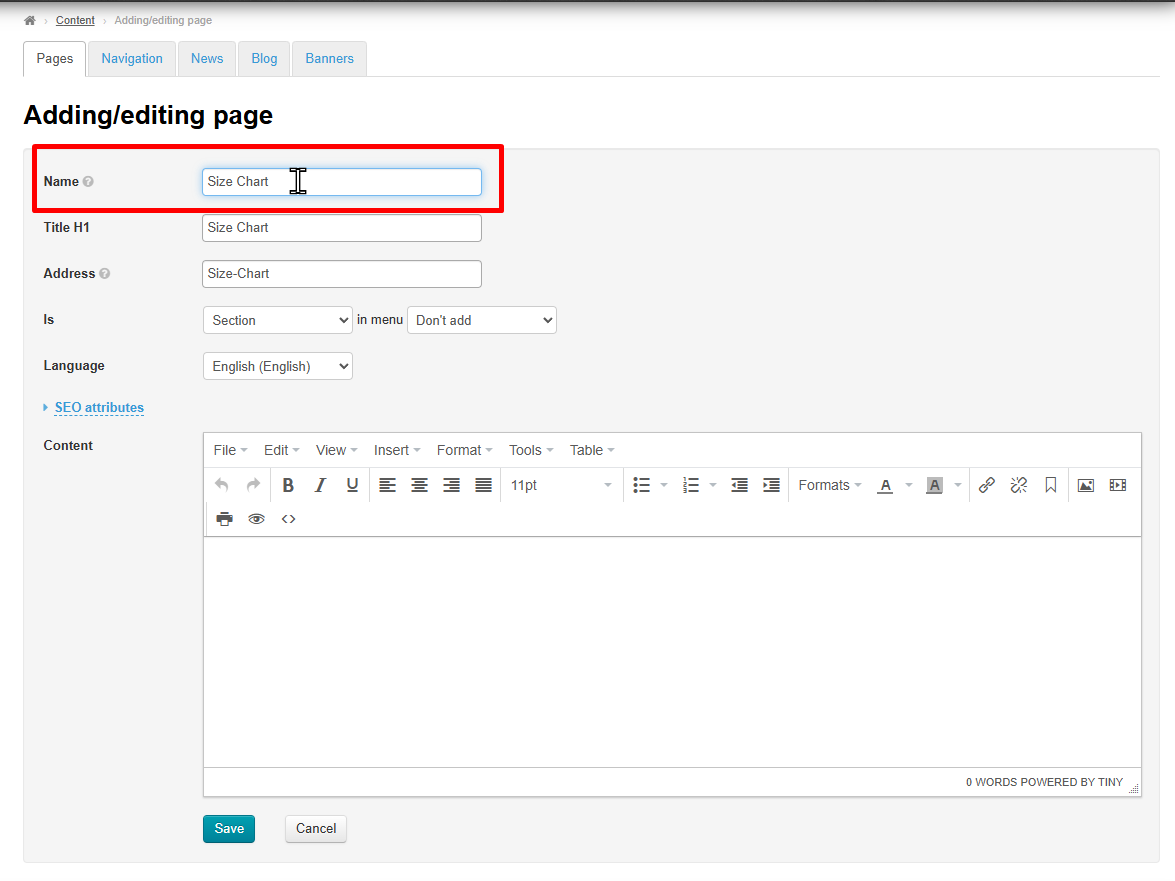
Указываем название страницы.
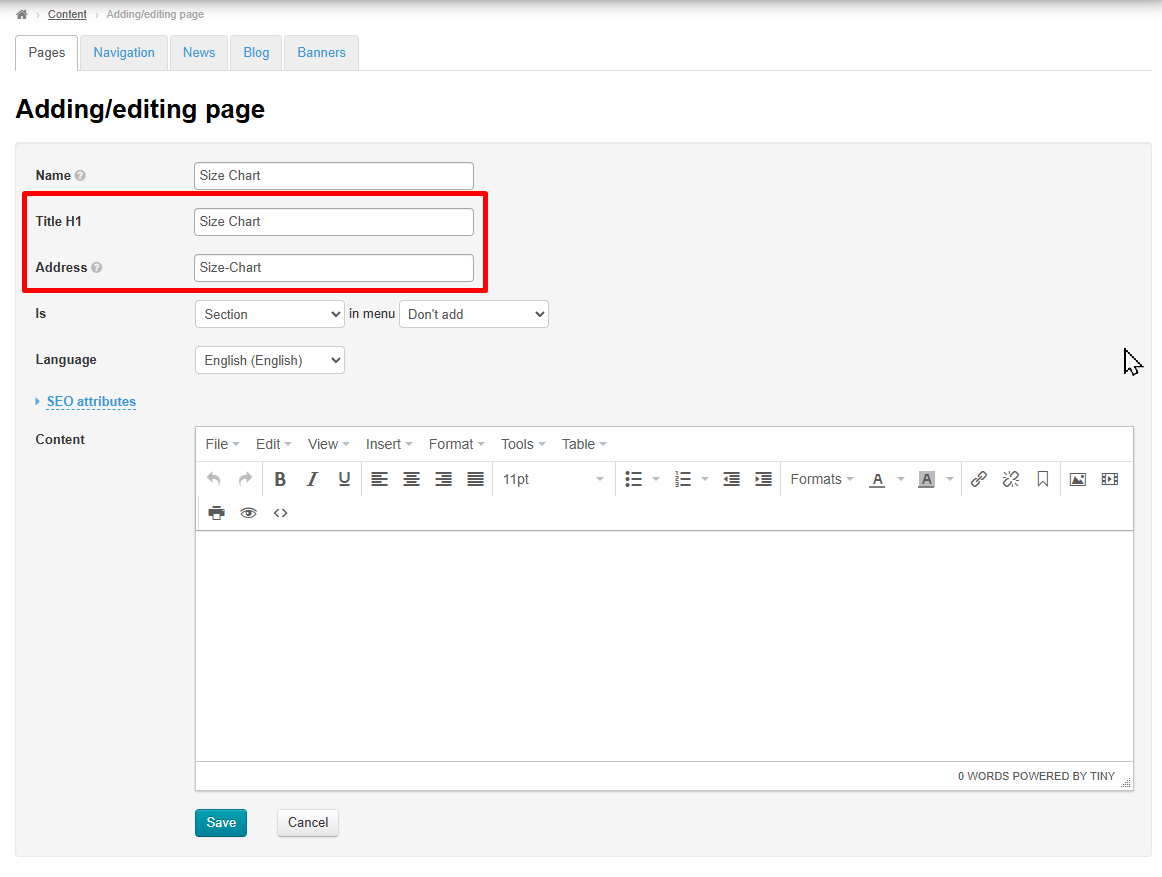
Поля «Заголовок H1» и «Адрес» заполнятся автоматически. Вы можете оставить как есть, а можете отредактировать по своему желанию.
Заголовок h1 будет отображен как заголовок в поисковых системах, а Адрес — использоваться в URL сайта.
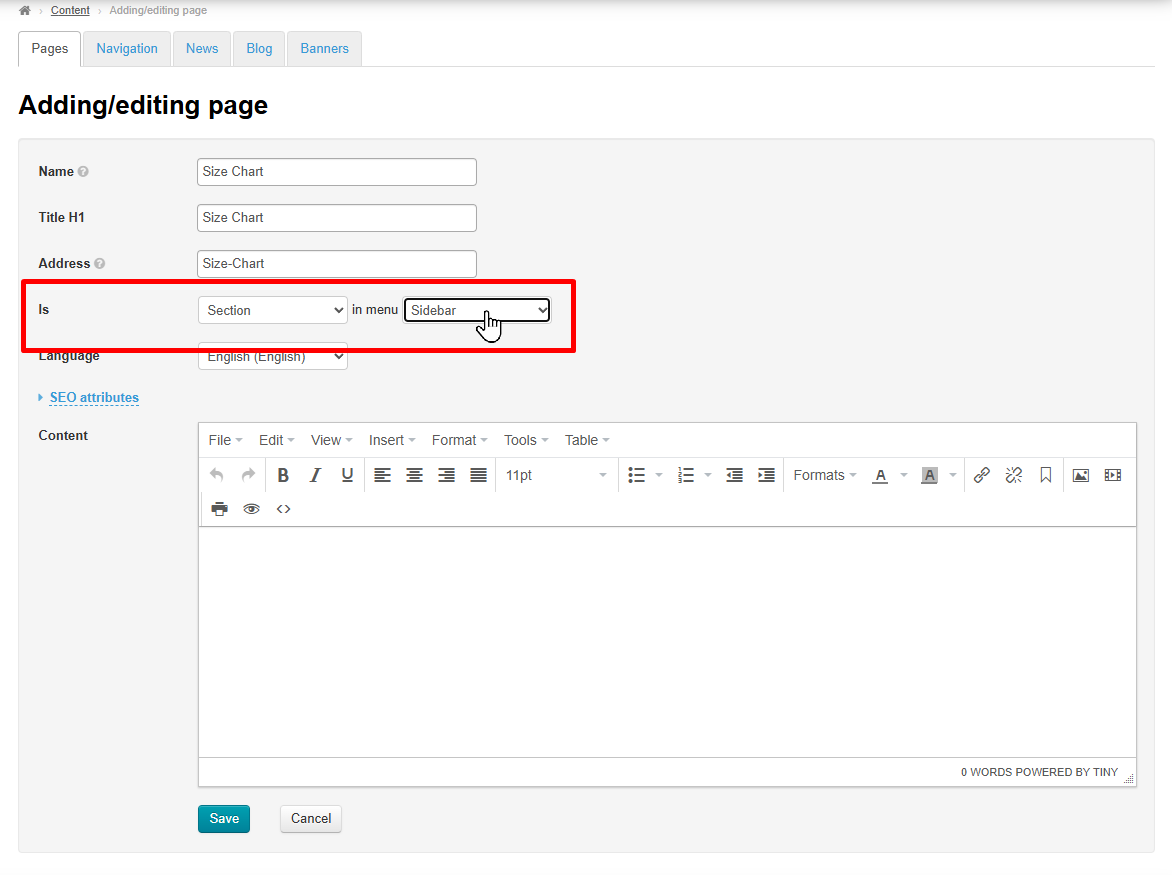
Если мы хотим изменить выбор раздел это или подраздел, можно сделать это в поле «Является…». И сразу указываем в каком меню хотим видеть нашу новую страницу.
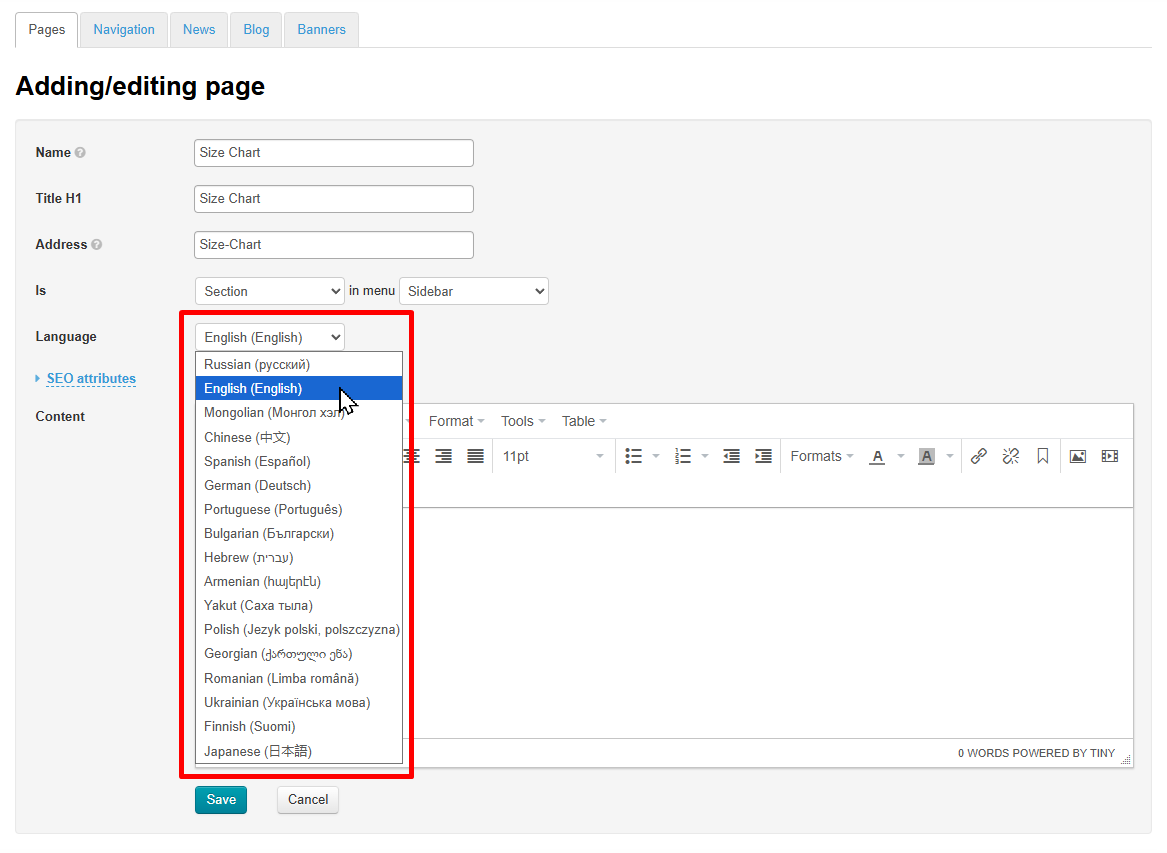
Далее выбираем языковую версию сайта из доступных.
Затем заполняем само содержание страницы.
SEO оптимизация для поисковых систем
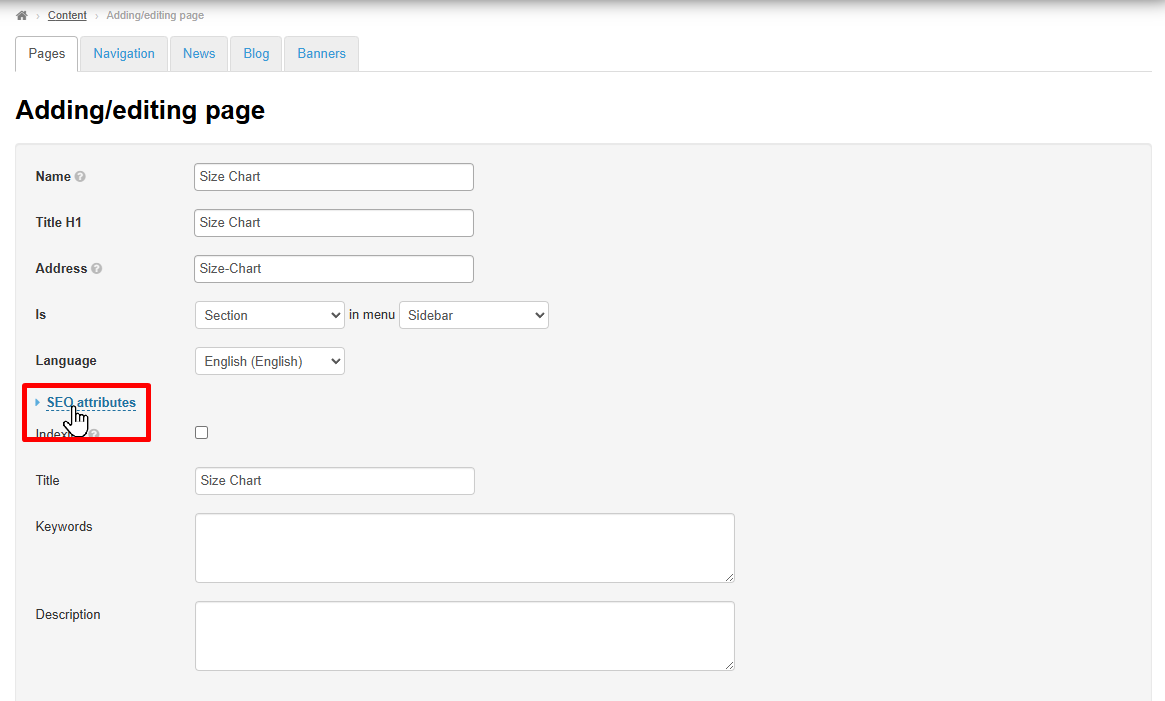
Кликаем по надписи «Атрибуты поисковой оптимизации».
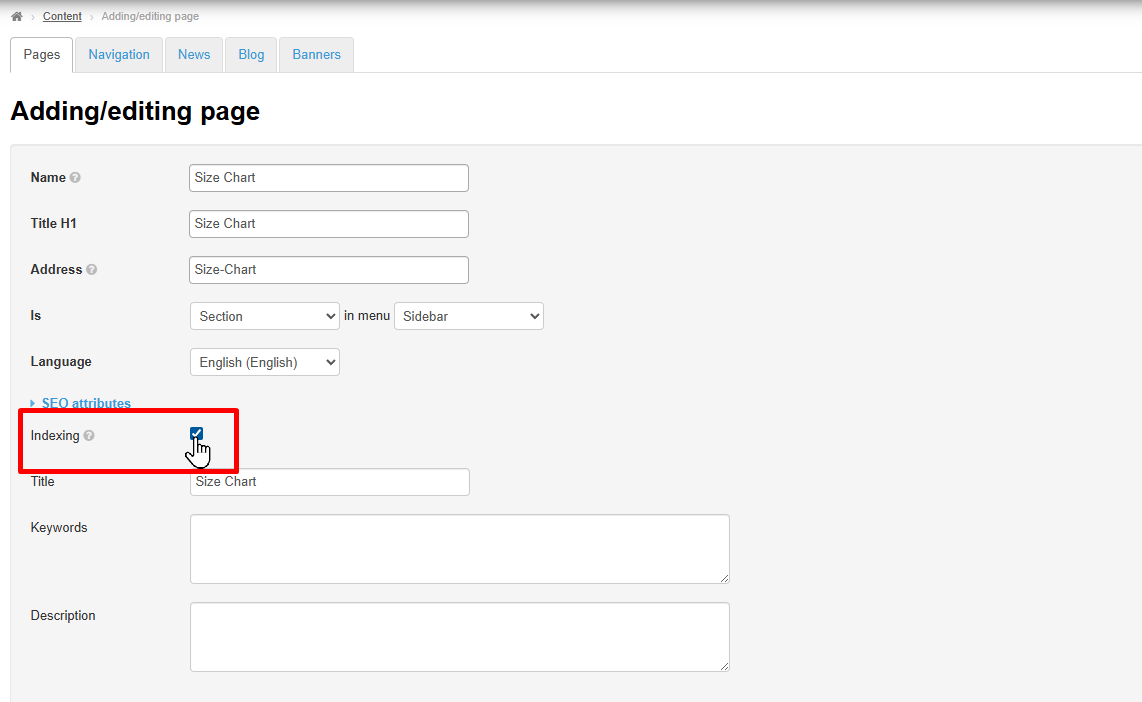
Если мы хотим чтобы поисковый робот проверил нашу страницу и добавил в поиск, ставим галочку «Индексация».
Указываем заголовок, который будут видеть поисковики.
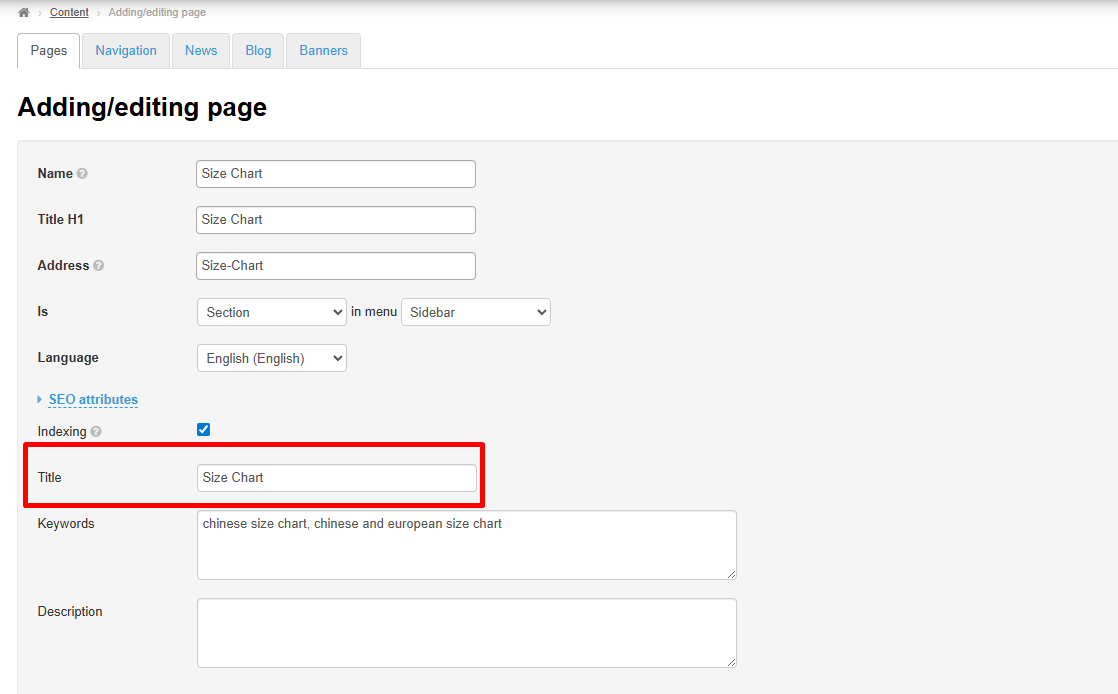
Пишем ключевые слова для поиска страницы (обычно до 6 фраз).
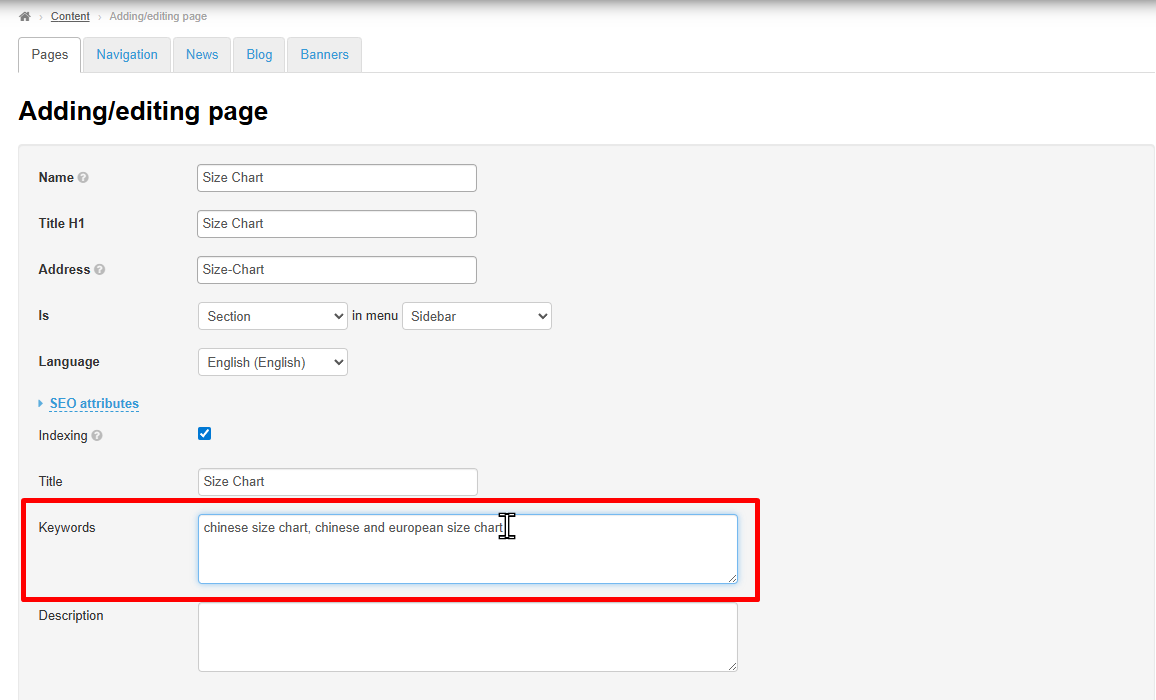
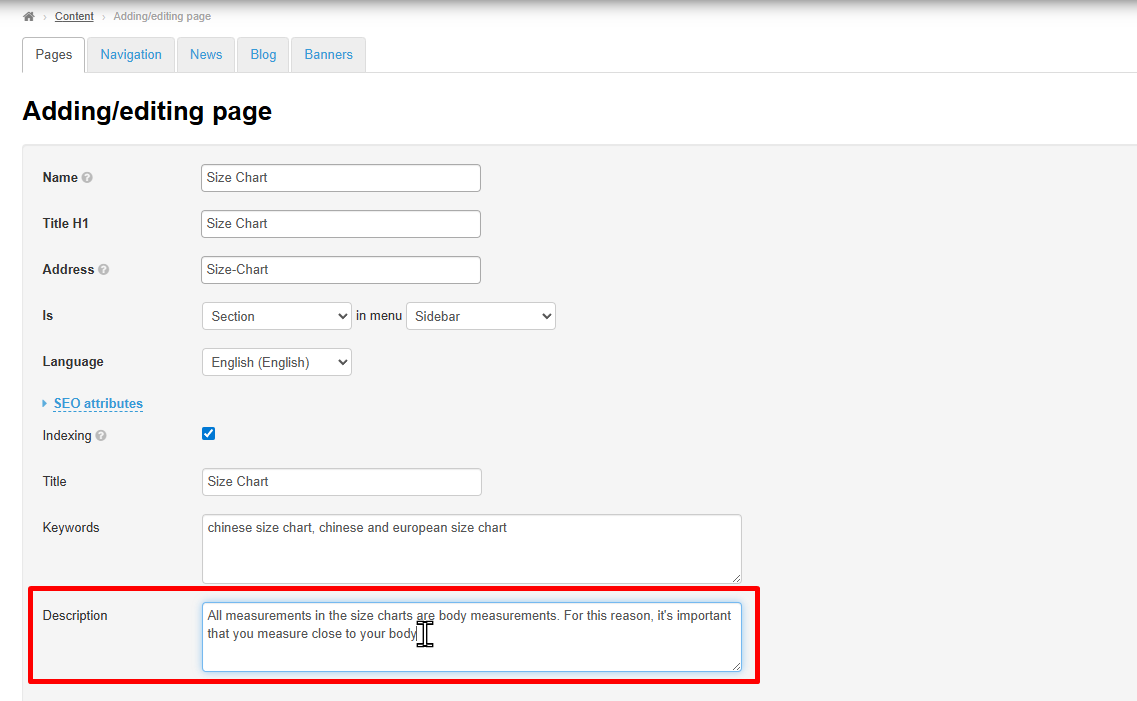
Вставляем небольшое описание. Размер зависит от поисковой системы, но рекомендуем добавлять описание около 120-150 символов.
Редактор страниц
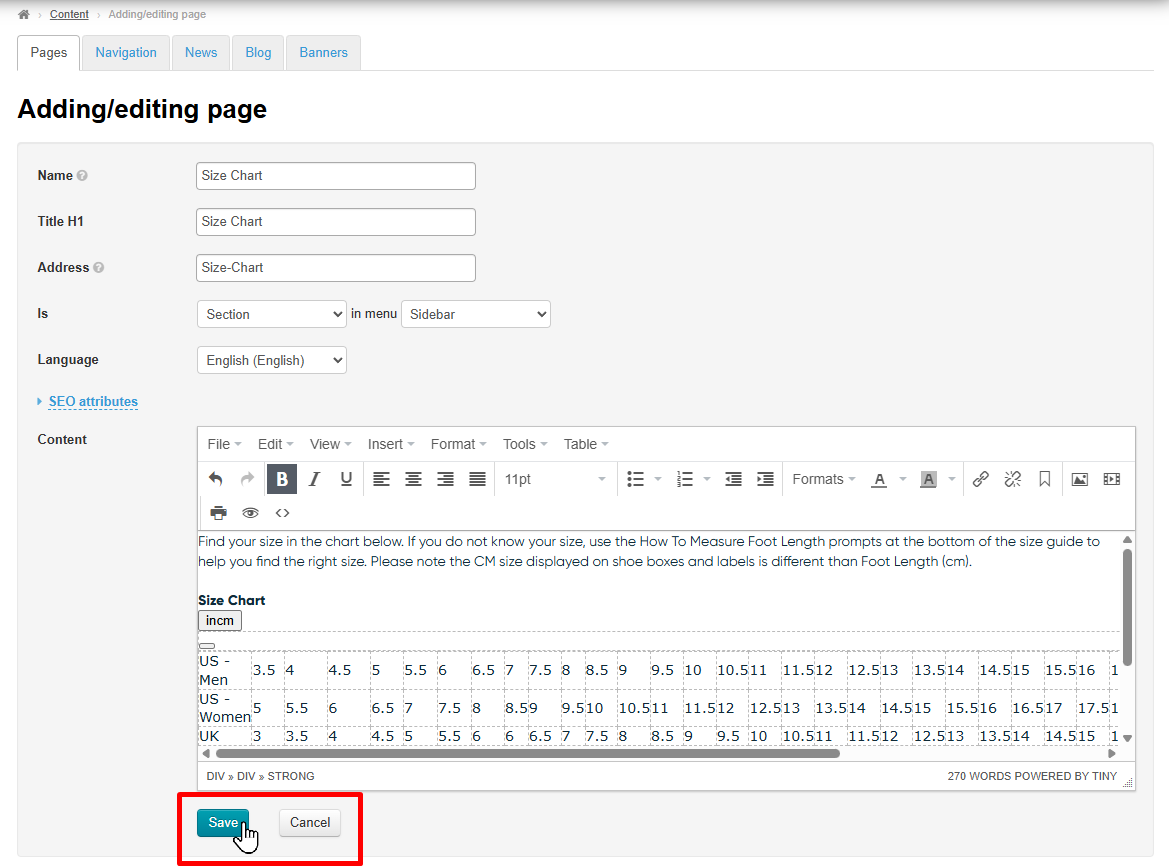
Само содержание страницы добавляется в этом блоке. Редактирование текста похоже на MS Word. Можно вставлять картинки, ссылки и форматировать текст.
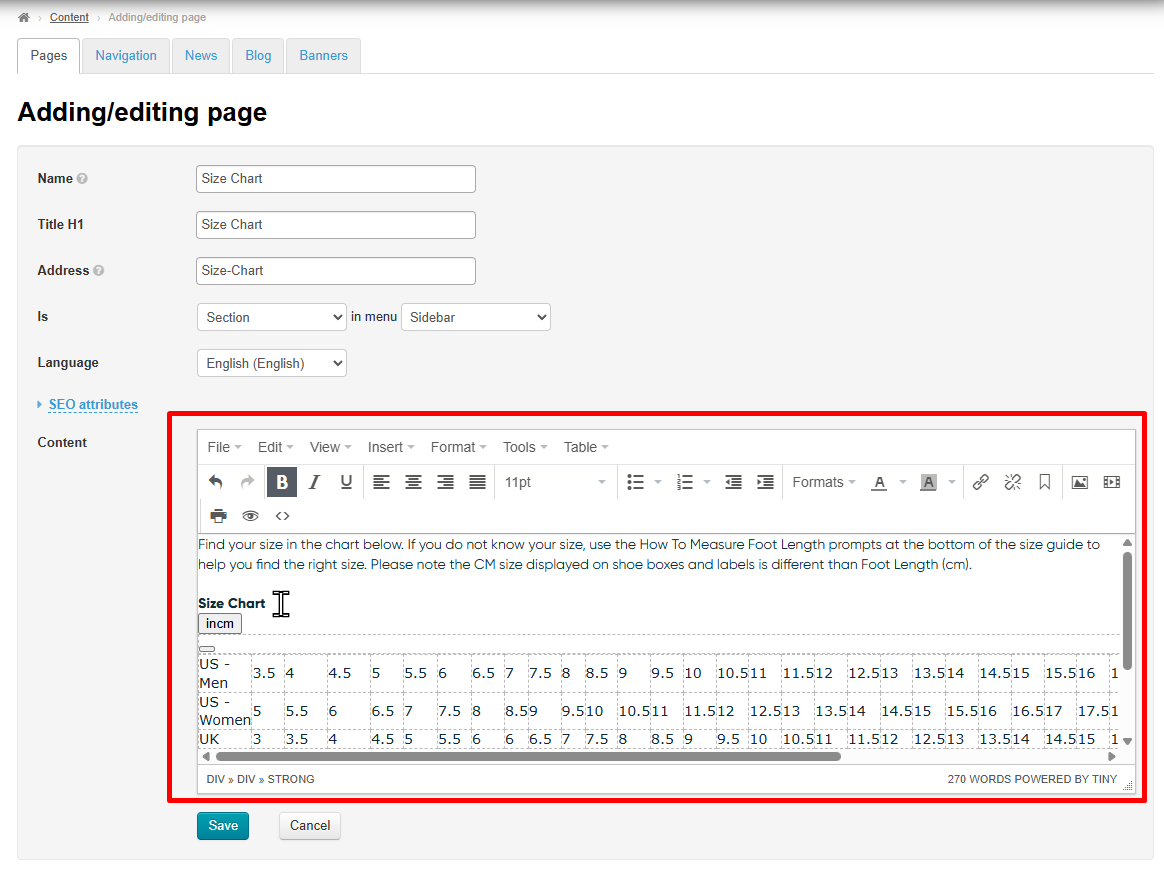
Сохраняем все добавленные материалы, нажав кнопку «Сохранить» или выходим из режима редактирования без сохранения, нажав «Отменить».
Редактировать
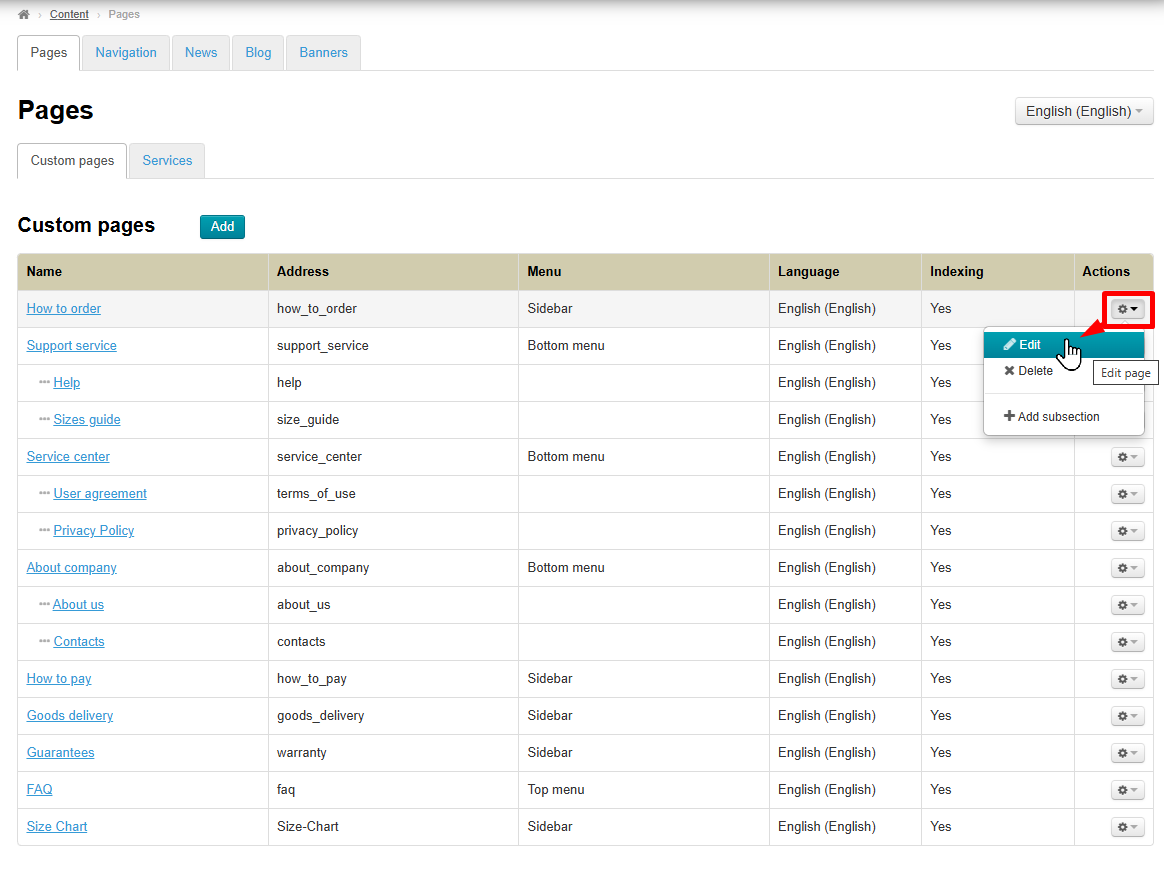
Чтобы отредактировать страницу, кликаем в колонке «Действия» на шестеренку и выбираем «Редактировать».
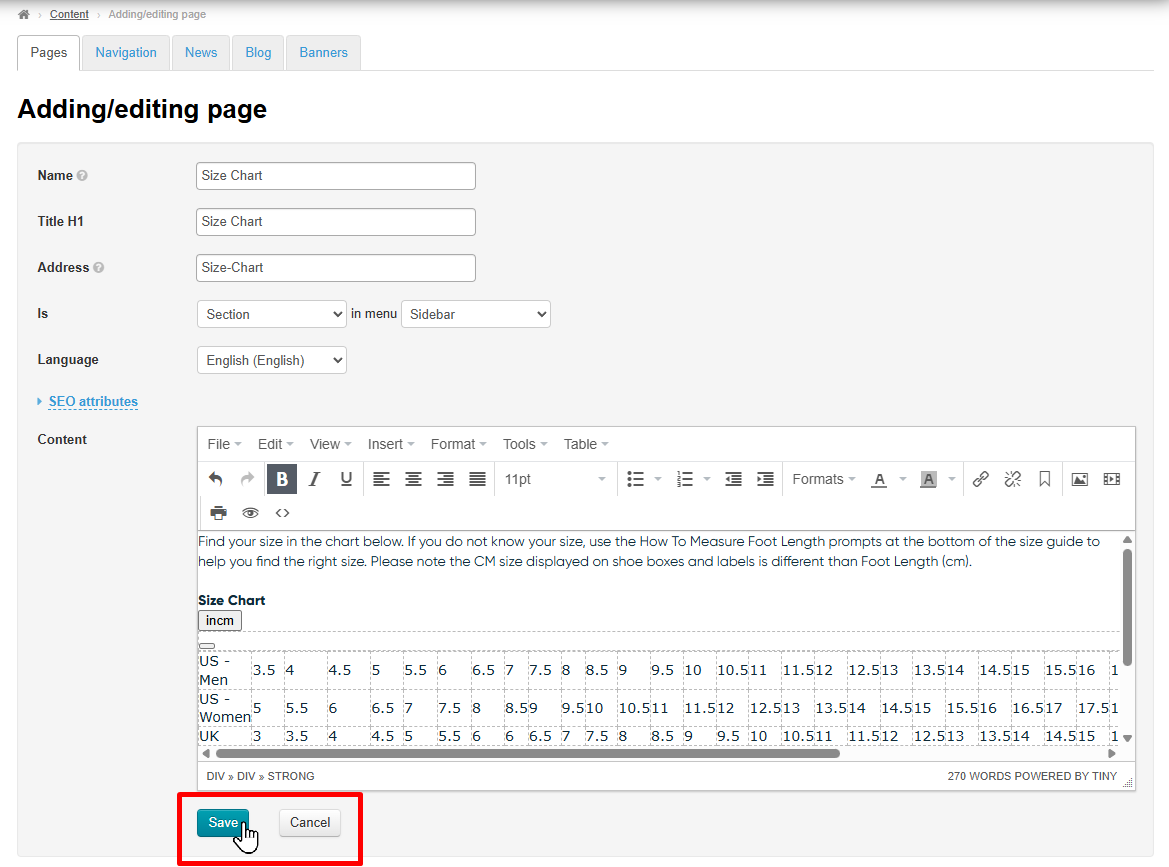
Сохраняем все добавленные материалы, нажав кнопку «Сохранить» или выходим из режима редактирования без сохранения, нажав «Отменить».
Удалить
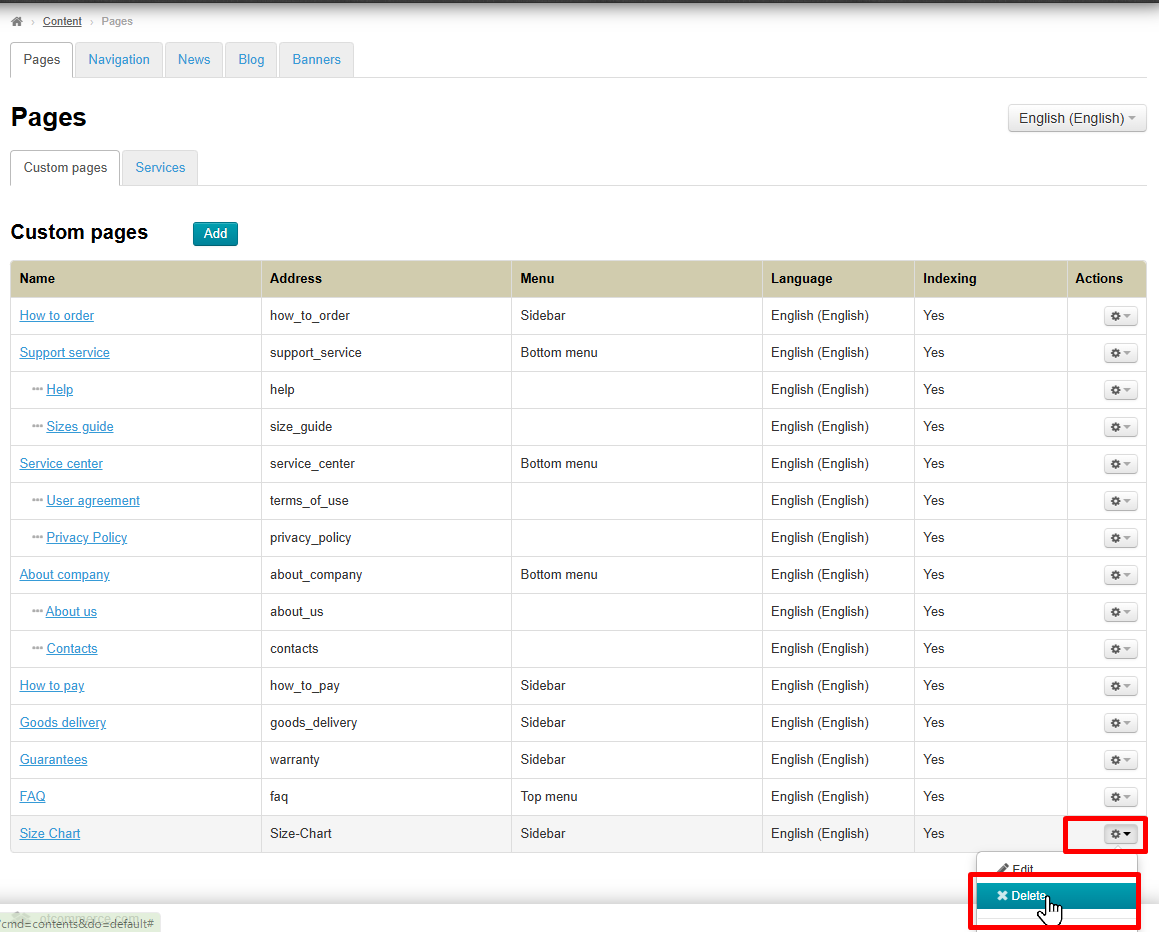
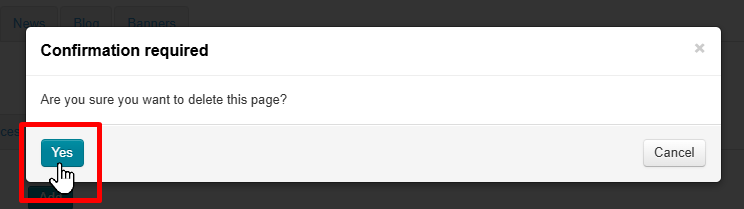
Чтобы удалить страницу, кликаем в колонке «Действия» на шестеренку и выбираем «Удалить».
Подтверждаем выбор, нажав «Да».
Включить и отключить отображение список страниц на сайте
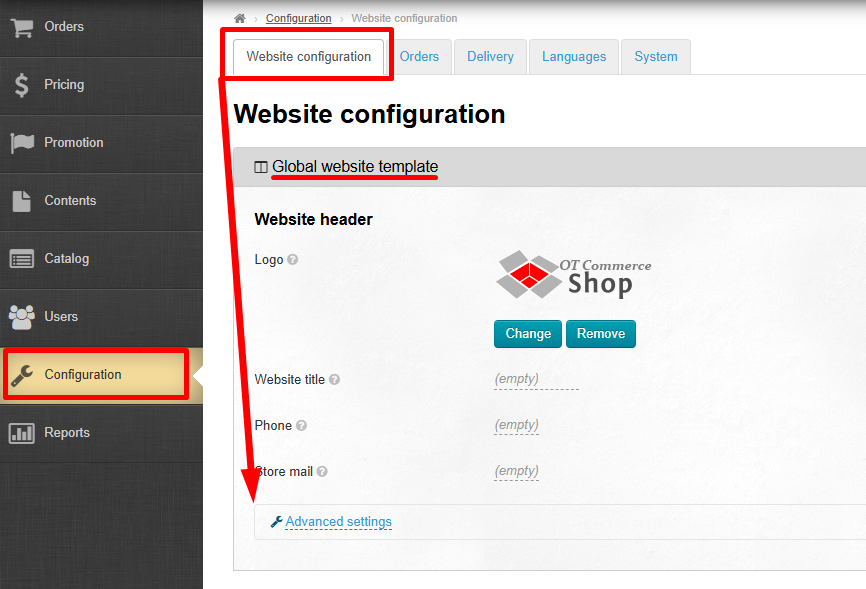
Отображение страниц настраивается в разделе «Конфигурация».
Расположение в админке: Конфигурация → Конструкция сайта →Глобальный шаблон сайта → Расширенные настройки.
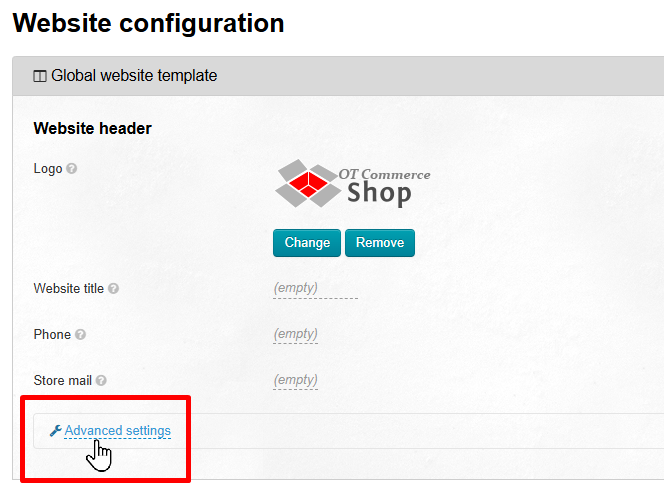
Кликаем по надписи «Расширенные настройки» и откроются дополнительные настройки сайта.
Нас интересует только настройка «Навигация в колонке».
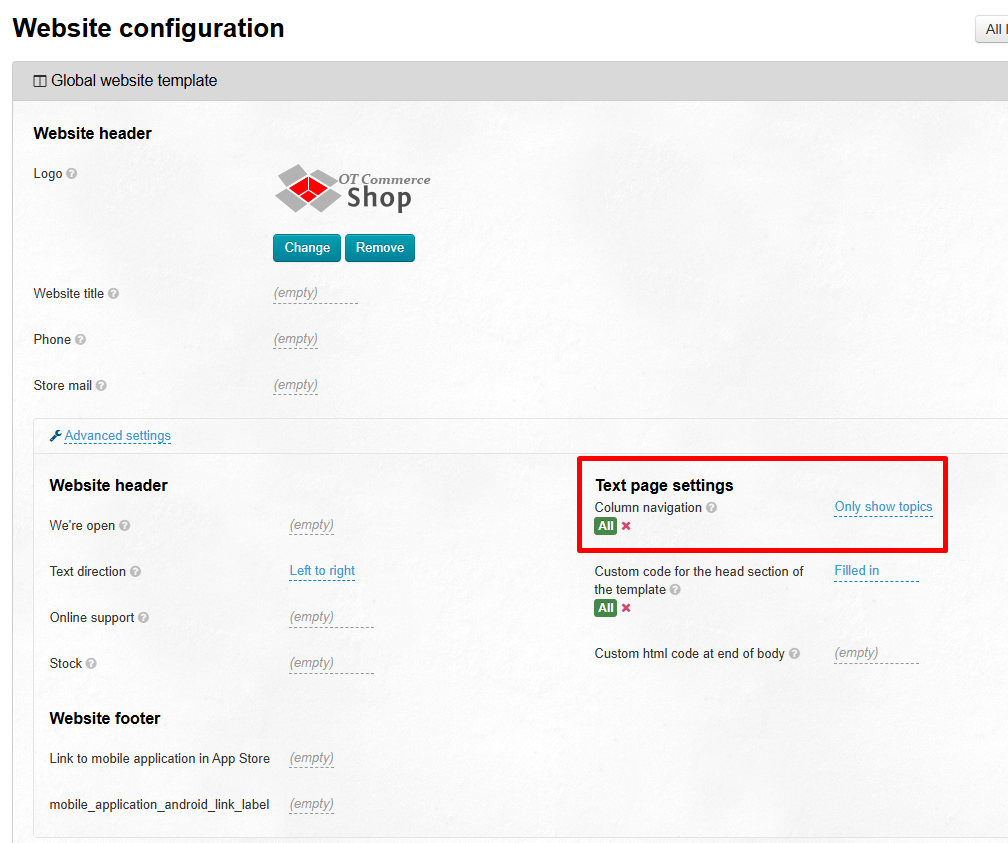
Кликаем по синей надписи слева и в списке из 3 вариантов выбираем тот, который нам интересен (ниже показана разница отображения разных вариантов).
Для сохранения нажимаем кнопку с галочкой.
...
Отображать все страницы
...
...
Отображать только разделы
(при этом выборе будет возможность кликнуть на «треугольник справа и открыть подкатегории)
...
...
How It Looks on the Website
Website Header: Everything for Order
We recommend placing the most popular and essential pages here - those that help customers make a decision while choosing products.
For example:
- delivery cost calculator
- size chart
- delivery and payment terms, etc.
These pages are used frequently by your customers and directly influence whether they proceed with a purchase.
Website Footer: All Information About Terms and Policies
This section includes:
- site policies
- guarantees
- contact information
- articles about placing orders, etc.
These pages are not critical during the product selection stage (unlike, for example, a size chart). However, once a customer is interested in your products, they will look for additional information in the footer.
Therefore, all important information you want to communicate to your customers should be added here.
Sidebar: Subsections of Text Pages
The sidebar is visible only when the customer is viewing text pages.
Add pages
Sections and Subsections
Pages that can be added are organized into sections and subsections. This means you can either add a single page or create a page with subsections by adding multiple pages inside it.
The maximum nesting depth is 2. This means that a page can have subsections, but you cannot add another subsection to a subsection.
Add
Click "Add" button to add a page.
To add a subsection, click the gear icon in the “Actions” column and select “Add subsection”.
Enter the page title.
“Title H1” and “Address” titles will be filled in automatically. You can leave them as they are or edit them if you wish.
H1 title will be displayed as the page heading in search engines, while the Address will be used in the website URL.
If you want to change whether it is a section or a subsection, you can do so in the “Is…” field. You can also immediately specify in which menu you want your new page to be displayed.
Next, select website language version from the available ones.
Then fill in the page content.
SEO Optimization for Search Engines
Click “SEO Attributes.”
If you want search engines to crawl your page and include it in search results, check the “Indexing” box.
Enter the title that will be displayed in search engines.
Enter keywords for searching the page (usually up to 6 phrases).
Add a short description. The length depends on the search engine, but we recommend keeping it around 120–150 characters.
Pages Editor
The page content itself is added in this block. Text editing works similarly to MS Word. You can insert images, links, and format the text.
Save all added content by clicking “Save” button, or exit the editing mode without saving by clicking“Cancel”.
Edit
To edit a page, click the gear icon in the “Actions” column and select “Edit”.
Save all added content by clicking “Save” button, or exit the editing mode without saving by clicking“Cancel”.
Delete
To delete a page, click the gear icon in the “Actions” column and select “Delete”.
Confirm your selection by clicking “Yes.”
Enable and Disable Page List Display on the Website
Pages display can be configured in “Configuration” section.
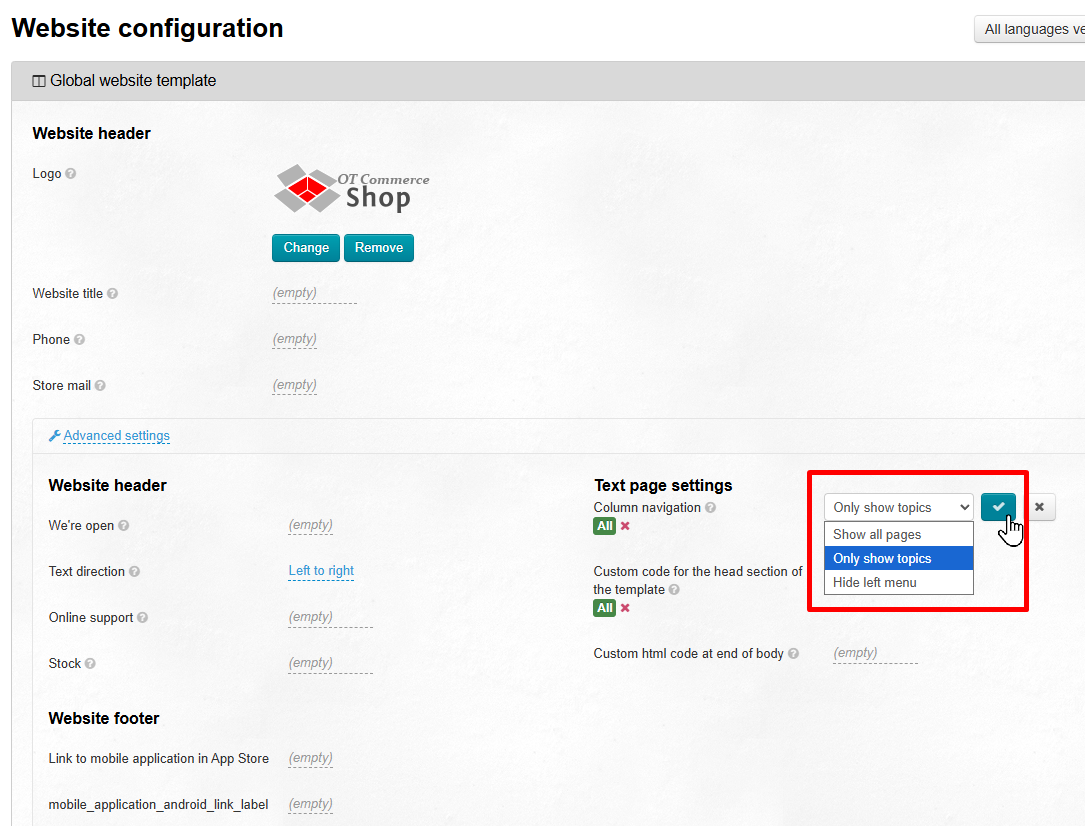
Location in admin panel: Configuration → Website configuration → Global website template → Advanced settings.
Click “Advanced Settings”, and additional site settings will open.
We are only interested in “Column Navigation” setting.
Click the blue label on the left, then choose the option you need from the list of three available variants (the differences between the display options are shown below).
To save your changes, click the checkmark button.
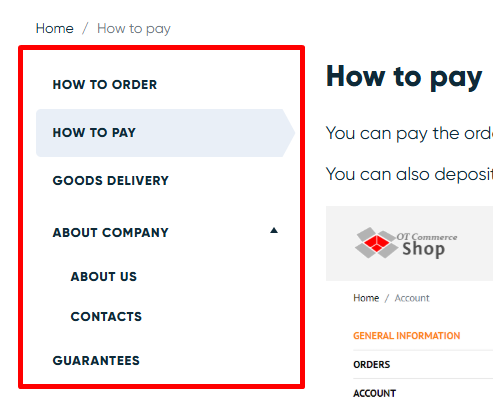
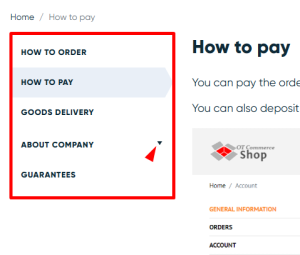
| Navigation Selection | How it looks on the website when viewing pages |
|---|---|
Show all pages |
|
Only show topics (at the same time, users will be able to click the triangle icon on the right to expand and view subcategories) |
|
| Hide left menu | Меню не будет видно на сайте |
Website Page Layout
Pages are added in the "Navigation" section if they weren't added when adding or editing a page.
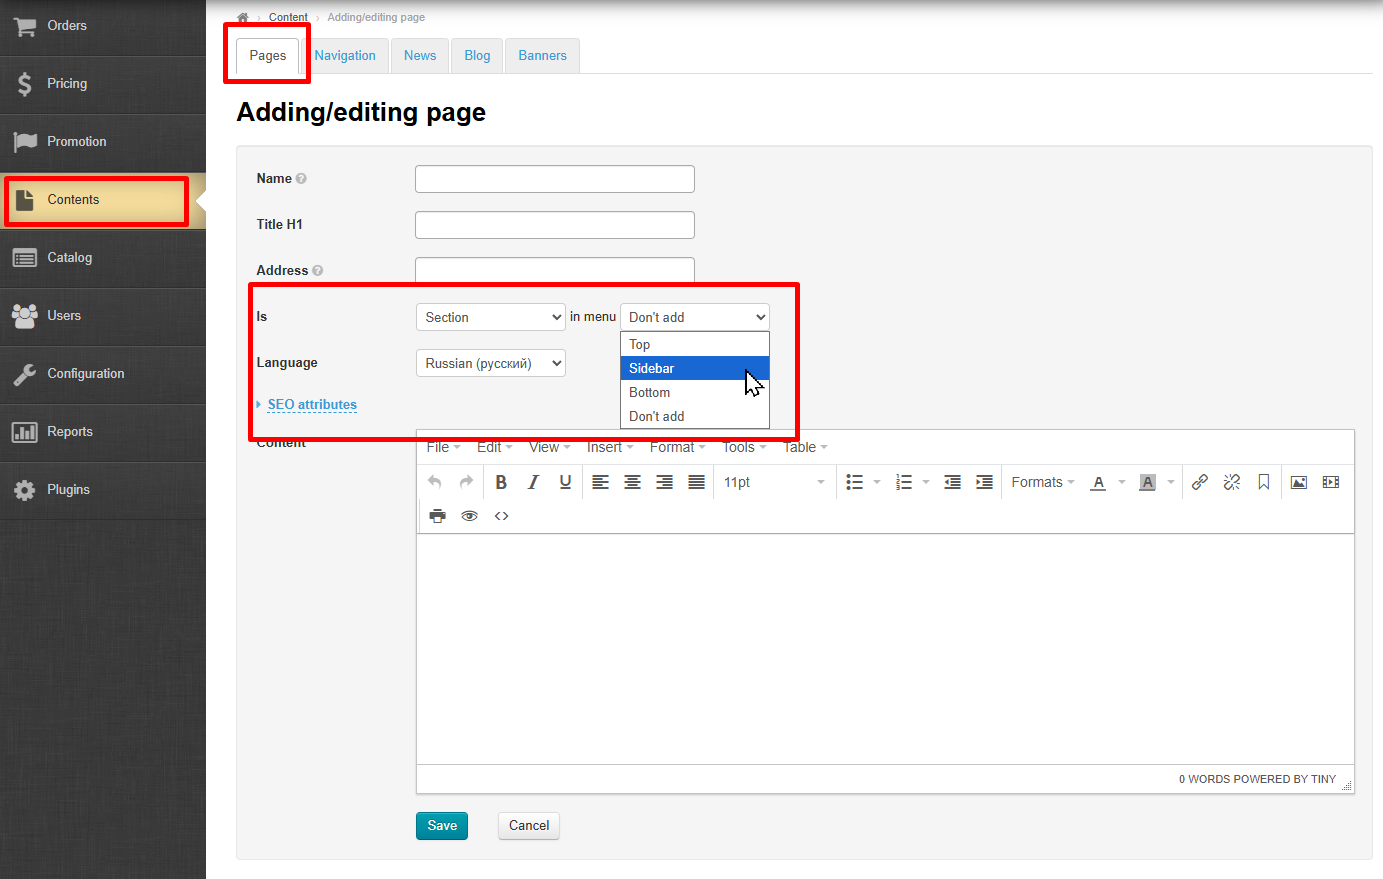
Location in admin anel: Contents → Navigation
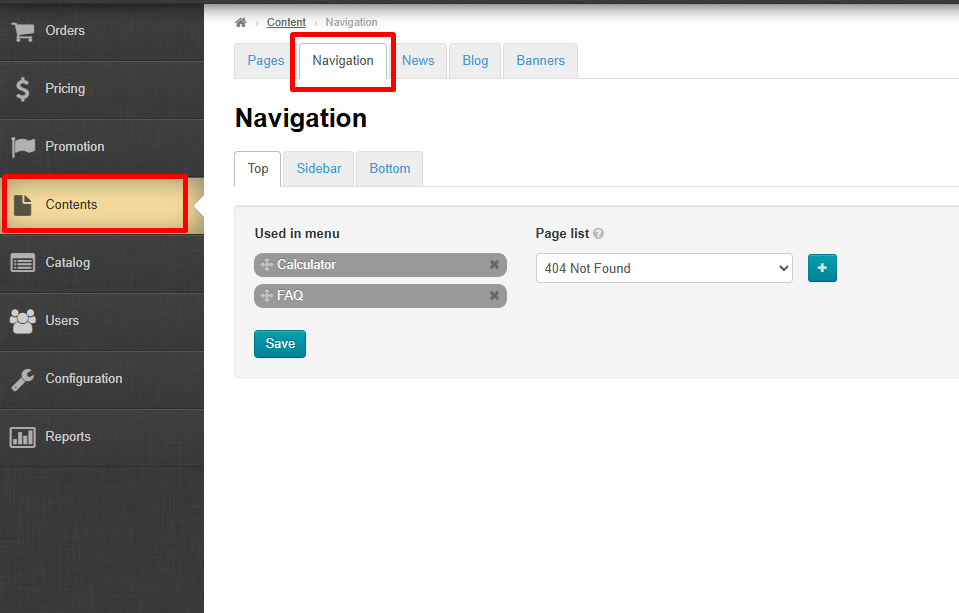
Here you will read how to add pages to different parts of the website menu.
There are 3 tabs in “Navigation” section, that determine where customers will see the pages.
Select the required tab:
- Top tab - pages in the website header
- Sidebar tab - pages in the side menu
- Bottom tab - pages in the footer
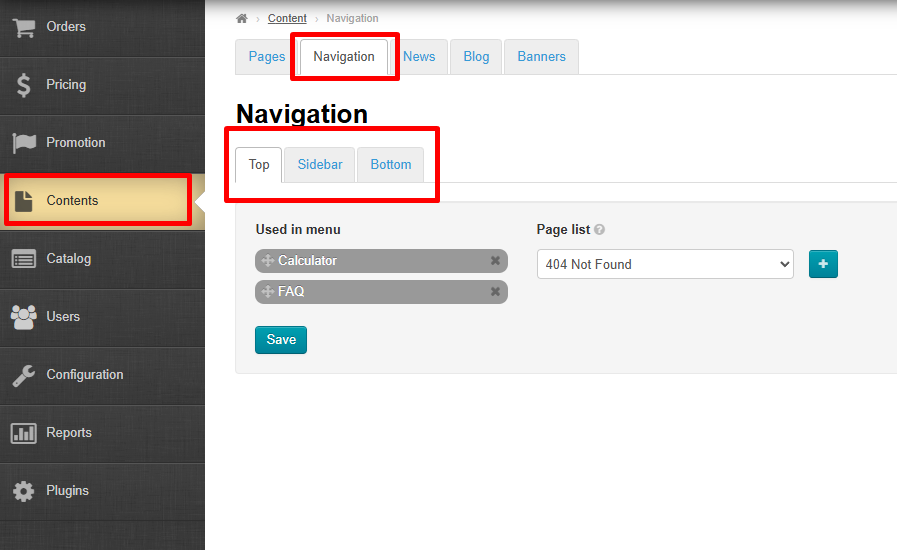
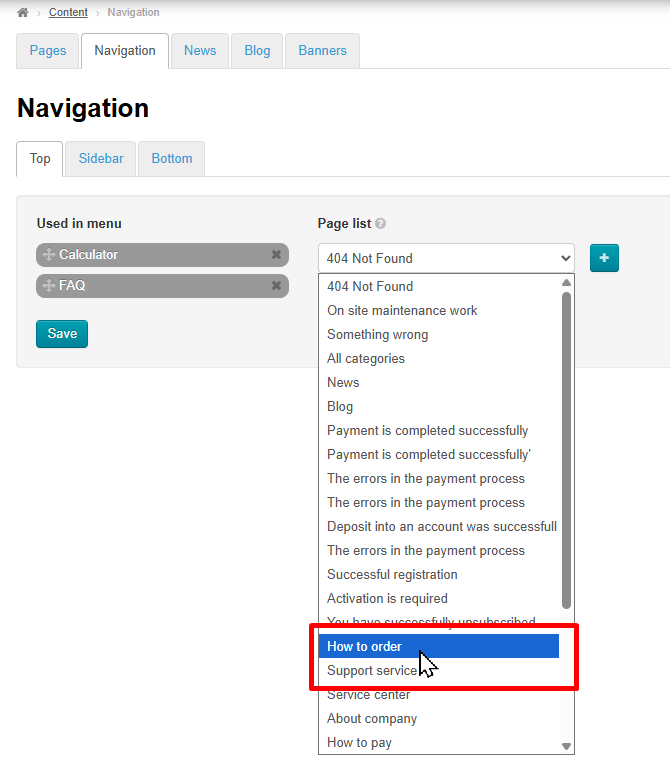
In the selected tab, choose the pages you want to display in the menu by clicking them in the list on the right.
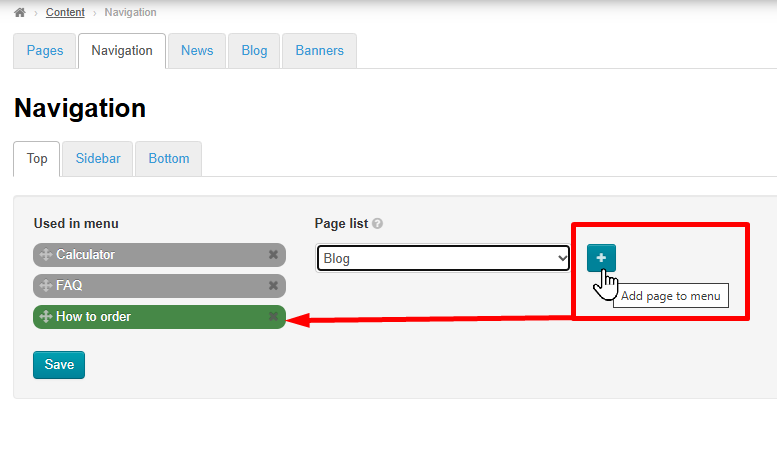
After selecting the page, click “+” button and selected page will appear in the list on the left. It will be highlighted in green.
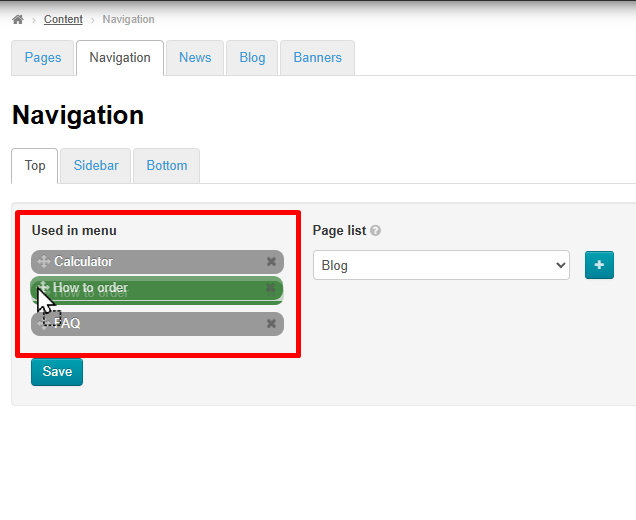
To change page order, click and hold ✥ icon (to the left of the page name), then drag the page up or down.
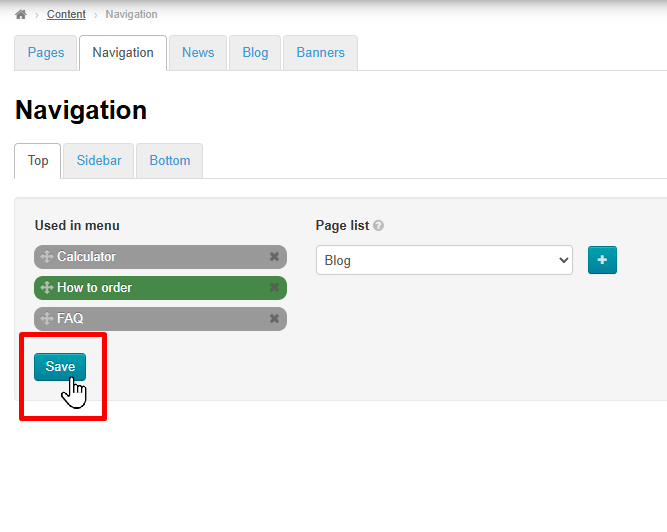
Click "Save" button
Расположение страниц на сайте
Добавляются страницы в разделе «Навигация», если это не было сделано во время добавления/редактирования страницы.
Расположение в админке: Содержание → Навигация
Рассмотрим как добавить отображение страниц в разных частях меню.
В разделе «навигация» есть 3 вкладки, которые отвечают за то, где покупатели увидят страницы.
Выбираем нужную вкладку:
- Верхняя — страницы в шапке сайта
- В колонке — страницы в боковом меню
- Нижняя — страницы в подвале сайта
В выбранной вкладке справа в списке выбираем кликом мышки страницы которые хотим видеть в меню.
После выбора, нажимаем на кнопку «+» и выбранная страница окажется в списке слева. Она пометится зеленым.
Чтобы поменять порядок страниц, нажимаем и удерживаем мышку на символе ✥ (слева от названия страницы) и перестаскиваем страницу вверх или вниз.
В конце всех действий нажимаем «Сохранить».