
| Оглавление |
|---|
Description
WebView
...
is
...
a
...
specific
...
format
...
for
...
mobile
...
applications.
...
Website
...
will
...
be
...
displayed
...
exactly
...
as
...
in
...
mobile
...
version
...
but
...
without
...
the
...
ability
...
to
...
“walk” through
...
the
...
browser
...
tabs
...
and
...
to
...
other
...
sites
...
(your
...
buyer
...
will
...
not
...
accidentally
...
go
...
to
...
other
...
tabs).
WebView — это особый формат мобильных приложений. Сайт будет отображаться 1 в 1 как в мобильной версии, но без возможности «гулять» по вкладкам браузера и переходить по другим сайтам (ваш покупатель не уйдет случайно на другие вкладки).
In addition, this is an extended mobile version of your site which allows you, for example, to add push notifications about promotions and sales.Кроме того, это расширенная мобильная версия вашего сайта, что позволяет, например, добавить push-уведомления об акциях и распродажах.
| Информация | ||
|---|---|---|
| ||
Ограничение: новые приложения будут доступны только для адаптивных шаблонов (В Коробке ОТ это шаблон Elastic)! |
Пример внешнего вида сайта в приложении WebView
Пример push-уведомления
Настройка для App Store и Google Play
Создание проекта будет в Firebase
Создаем проект
Limitation: new applications will be available only for adaptive templates - website has a mobile version (It is Elastic template in OT Box)! |
An example of website design in WebView application |  |  |
|---|
Example of push-notification

Settings for App Store and Google Play
Project creation will be in Firebase. A developer account is required.
Where can I get a developer account?
Google Play
Step 1: Create account
Follow the link https://play.google.com/console/u/0/developers
| Информация | ||
|---|---|---|
| ||
Use VPN (relevant for residents of the Russian Federation) if following the link does not work |

Make sure to create a new account

Fill in the fields and click "Next" button

Verify your phone number.


After registration Google will require you to enable two-step verification to access the developer interface. Follow the prompts and turn it on for a while.
Before transferring the account to developers, it is better to turn off two-step authentication while working with the application or be ready to constantly send verification codes to developers.

Disable via account settings

Select "Security" in the menu

Select "Signing in with 2-Step Verification was turned on" in the list of recent activities

Enter your password again and turn off 2-Step Verification

This is unsafe, so turn it back on immediately after finishing work on the application! The scheme is similar to turning off.
Follow the link https://play.google.com/console/u/0/developers again and create a developer account for the organization

Step 2: Fill out the questionnaire and accept the terms of the agreement
A questionnaire will open which you will need to fill out as well as check the consent boxes. Pay attention to “Developer name” and "Organisation name" fields, as they will be seen by users on Google Play.


Step 3: Account payment
Pay 25$ fee with a credit card. You will need to confirm your identity (passport photo or driver's license) after payment

Create project
Follow the link Переходим по ссылке https://firebase.google.com/
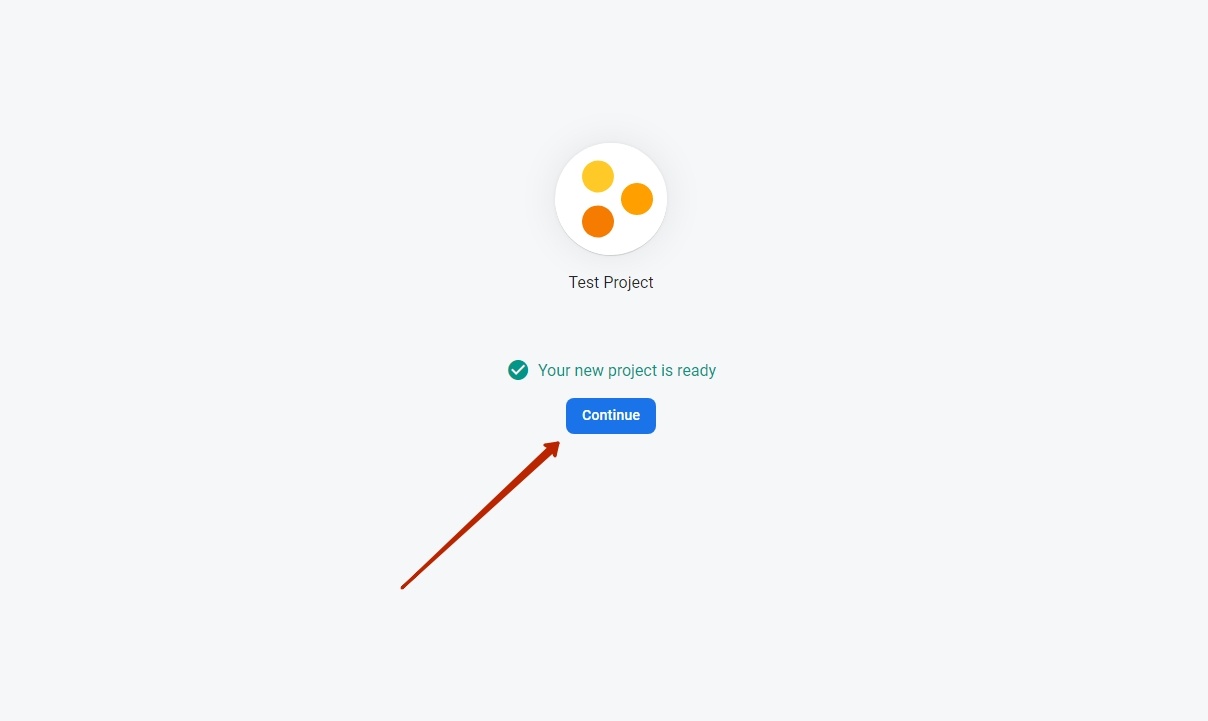
Указываем название проекта (1), ставим галочку рядом с соглашением (2) и нажимаем кнопку «Continue» (3)
нажимаем кнопку «Continue»
Создаем приложение
Здесь уже есть выбор: создавать для Android или для iOS. В примере выбрано создание приложения для Android
Шаг 1
В поле «Android package name» (1) указываем на английском уникальный идентификатор приложения в магазине приложений (App Store или Google Play) Bundle ID.
В поле App nickname (2) указываем любое название приложения (рекомендуем указать название вашего магазина на базе Коробки ОТ)
...


Specify project name (1) - your website URL (domain name), put a tick next to the agreement (2) and click “Continue” button (3)
You can turn on Google Analytics at this stage (1), or you can do it later (optional). Click “Create project” (2)
Continue” button
Create application
There is a choice here: create for Android or for iOS. The example shows how to create an Android application
Step 1
Make a unique application identifier (Bundle ID) in English in “Android package name” field (1) in the application store (App Store or Google Play).
How to make Bundle ID?
- Take your website URL (for example, bundle.my)
- Take your website name in Latin (Name)
- Combine option1 and option2 by writing through a dot: firstly, the end of domain my (you can have any: com, ru, org, etc.), then the second part of domain bundle (you get com.bundle) and finally, the store name in Latin: Name (you get my.bundle.name)
More examples:
Address/URL | Website name | Bundle ID |
|---|---|---|
| top-test.otcommerce.com | Top-test | com.otcommerce.toptest |
| https://www.google.com/ | search | com.google.search |
| https://tao-bao.mn/ | tao-bao | mn.taobao.taobao |
We recommend to specify name of your store based on the OT Box in “App nickname” (2) field.
Register application clicking “Register app” button (3)
Шаг Step 2
Скачиваем себе на компьютер Download *.json файл, нажав на кнопку «Download file to your PC clicking “Download google-services.json» json” (1)
Нажимаем кнопку «Next» Click “Next” button (2)
Шаг 3
...
Step 3
Scroll down to “Next” button and click it. All fields will be filled in automatically and you do not need to add anything.
Шаг Step 4
Нажимаем кнопку «Continue to console»
Добавляем PUSH уведомления
В созданном выше FireBase проекте переходим в пункт Cloud Messaging
Заполняем поле заголовок «Notification title» (1) и текст сообщения «Notification text» (2)
Click “Continue to console”

Add PUSH notifications
Go to Cloud Messaging in the FireBase project created above


Fill in the title field “Notification title” (1) and the message text “Notification text” (2)Click “Next” button Нажимаем кнопку «Next» (3)
В блоке Target выбираем приложение, для которого отправляем Push-сообщение. В одном проекте может быть несколько приложений.
...
In the Target block select the application for which we are sending a Push message. One project can have several applications including Android and iOS (1)
Нажимаем кнопку «Next» Click “Next” (2)
...

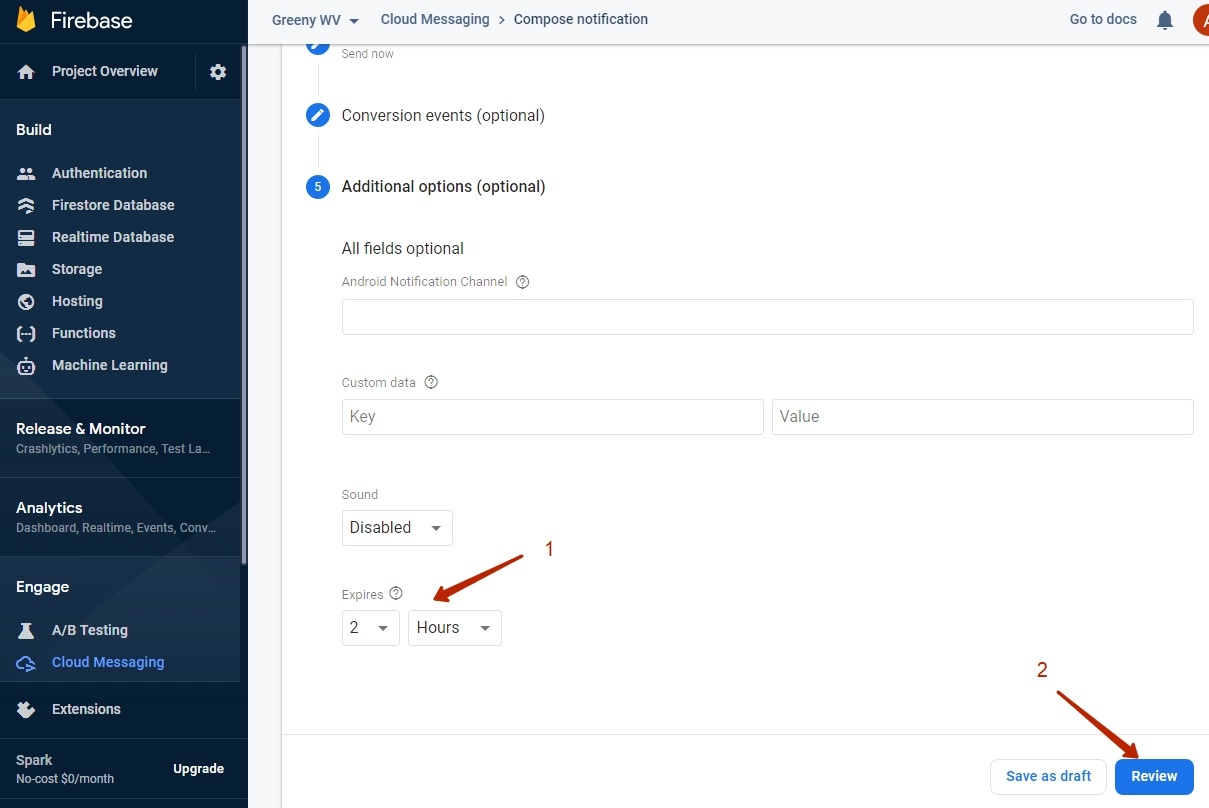
Don't change anything in 2 next steps and just click “Next” button both timesВыбираем
Select (1)...
message lifetime (how long it will be relevant and wait for the user when he appears on the network. This feature helps to set promotions and time-limited offers).Click “Review” button after that (2)
Check settings after that and click “Publish” button.
It is ready

| Информация | ||
|---|---|---|
| ||
Limitation: new applications will be available only for adaptive templates (It is Elastic template in OT Box)! |
Затем нажимаем кнопку «Review» (2)
,
Далее проверяем настройки и нажимаем кнопку «Publish»
Готово
...